I don't know how I could forget about these. Tinnies! I remember when I first saw them in the pages of Somerset Studios created by Lisa Kaus! These are the most adorable little containers that offer up a lot of possibilities for organizing within a creative space but what their use as a decoration within one's home?
I can see the smaller mushroom and black olive cans being used as Christmas tree ornaments. Remember my circular box ideas..... adding in a syrofoam snowball or a wooden round bead? What about filling the inside with florist foam, adding in a few small floral picks and topping with one of these for a face? Adding in a cone shaped hat? and hanging on the branches of a tree?
Of course, these could be used on a tabletop as a centerpiece too. Filled with lights, potpourri, and a candle. And what about tiering them? Wedding cake style? Okay, you'd have to turn them upside down, use a few different sized tin cans but you could hot glue them together so they wouldn't easily be knocked over. Punch some holes in the surrounding sides of the can above and poke some floral picks in there, layer as many as you'd like and add a small wooden candle holder to hold a taper candle or skip that and simply use a small pillar candle!!!
Another idea....... gosh, where is this coming from???? What about a pastry-style plate? Use the tin cans in the same fashion as above, from the lagest to the smallest, and add a variety of sizes of plates inbetween. Of course, you'd decorate the tins with paper, or spray paint in silver or gold or whatever color theme you're using in your home. Line the plates with tissue paper cut in the circular shape {easy enough using the plate as a template!} and decorate with either fruits of the season or baked goodies! Yummm....
And while I'm one the subject of "creative" decorating, I remember years ago I filled with home with luminaries made of canning jars. I purchased a bag of children's sandbox sand to fill them 1/3 of the way full, added a candle to the inside, and piece of decorative Christmas ribbon tied to the outside of the tops of the jars. I used these both inside and outside of our home. The sand keeps them from toppling over and extinguishes any stray sparks from the candles. The ones I added inside of our home were additional decorated by simply laying some sprigs of greenery, floral sprigs, and/or placing a shiny ornament beside its base.
And I cannot forget dressing up gifts! I love the wide wire ribbon available at this time of year and tend to stock up on it after Christmas is over. I love to use it sparingly around a few specially choosen gifts to decorate.... it adds a festive feel to the gifts under the tree. Bows created are always nice but tuck in a floral sprig and it's heavenly. Cinnamon sticks wrapped with a thinner ribbon and a floral sprig add another simple yet elegant touch!
Showing posts with label Inspiration. Show all posts
Showing posts with label Inspiration. Show all posts
Saturday, September 16, 2006


Speaking of my gratitude garland...
No, I've been neglectful and don't have any new links to share, but while typing the previous post I got to "thinking about it!" LOL! I began to wonder when was the last time that I created any new links for it? So, I checked my August archives {see it is a good thing that I post them here :) } and discovered it was August 10th!!! Anyways, the point that I wanted to make was an about another idea that came to me and related to my previous post.
Remember the stationery suitcase? What about using a box? Similar to my Partly Paper inbox? Boxes from food are plentiful enough.... stuffing, potatoes, rice, cereal, ect. Simply cut, cover, and decorate. Add in a some writing tablets, note pads, a card set, postcards, envelopes, gift tags .... and another inexpensive gift is born!!!
For additional decorating...... add a smaller scale garland or banner by punching a few small holes and tying them on or adhering in small sections. Or make it even more decorative by adding smaller paper medallions and allow either to swag in places!
And these boxes wouldn't necessarily have to hold a decorative stationery set either. Add in a candle and surround it with potpourri!!! Heavenly! I can see them now in an Autumn theme, with an autumn colored scented candle and smelling of spiced apples. Christmas themed ones would be cool, too, in holiday colors, images of Christmas past using Victorian diecuts and clip art filled with a candle, floral picks, and/or even used in place of a Christmas stocking. Wouldn't they make a cool centerpiece for a holiday table? Simply cut out a square on the side of the box instead of standing and filled with greenery and a candle for some glowing ambiance
Remember the stationery suitcase? What about using a box? Similar to my Partly Paper inbox? Boxes from food are plentiful enough.... stuffing, potatoes, rice, cereal, ect. Simply cut, cover, and decorate. Add in a some writing tablets, note pads, a card set, postcards, envelopes, gift tags .... and another inexpensive gift is born!!!
For additional decorating...... add a smaller scale garland or banner by punching a few small holes and tying them on or adhering in small sections. Or make it even more decorative by adding smaller paper medallions and allow either to swag in places!
And these boxes wouldn't necessarily have to hold a decorative stationery set either. Add in a candle and surround it with potpourri!!! Heavenly! I can see them now in an Autumn theme, with an autumn colored scented candle and smelling of spiced apples. Christmas themed ones would be cool, too, in holiday colors, images of Christmas past using Victorian diecuts and clip art filled with a candle, floral picks, and/or even used in place of a Christmas stocking. Wouldn't they make a cool centerpiece for a holiday table? Simply cut out a square on the side of the box instead of standing and filled with greenery and a candle for some glowing ambiance
or a string of Christmas lights with potpourri to cover them? Hmmmm........ who would have thought I'd think of all of this from a simple cereal box???? ROFLOL! I can see these in my creative mind now...... covered in a variety of papers, christmas gift wrap?, glittered hearts and stars. And how about that string tinsel? The kind manufactured for the miniature trees? Easily added as a trim for the bottom, top, or to swag around the sides of the box!!! Small 3D ornaments dangling from it......... OMG! I need to stop, my mind might explode! {smiles}
Mystical musings....
After sharing some of my recent artwork, {gratitude garland, artful banners, paper medallions, stationery suitcase, and my latest collage} I quickly realized that a lot of these items would make terrific gift items... especially as the Christmas season is right around the corner. My thoughts quickly turned to how can I re-create them in a way that first isn't too time-consuming --- if I'm going to be creating them, I'll need time to do that and secondly, how to keep my expenses down. Let's face it, if it is going to be costly to create these things, wouldn't it be easier to simply use the money and go shopping instead... there is a lot less stress involved there, LOL!
I got to brainstorming and realized that some of these things could be created in a big way only in a smaller version and using some additional things to personalize them and speed up the process.
The garlands: either the ring style of the gratitude or the artful banners can be made smaller. Can you envision them in a smaller scale? What about a 1/2" x 3" style for the ring one? You could cut a lot of them out of a single sheet of printed paper and cardstocks, use colors that would match the recipients decor and personalize them by themes. If I used staples to create the rings, they would go together fairly quickly and creating a 4 or 5 foot one which could drape over a curtain rod, dress up a shelf, or add a ribbon or fiber hanger to them could be hung on a wall using simple push pins, hung over a picture grouping on a wall.
The artful banners could also be created on a smaller scale and I think that they would be adorable hanging on the edge of a shelf. The banner style itself hosts a lot of possibilities, what about using circles, diamonds, a rectangle with a triangular cut out to resemble the cut ends of ribbons? Again, very easy to personalize! Colors, themes, sizes... A package of scrapbook embellishement would assist with the smaller scale and stickers for images wouldn't be too awful expensive, right?
The paper medallions.... oh how I am loving these! So easy to create and they can adorn almost anything! I can even see them added to the joined spaces between the artful banners, on a gift tag, a gift bag, as a jar topper. Paper choices are fantastic, anything from vintage documents, wallpaper, sheet music, book pages to simple scrapbook printed papers. Then my mind began to wonder with even more possiblities... can you see them layered? This puzzled me for a moment as I realized how they are folded and the thickness of the center when it dawned upon me that as it being folded and before it spread out, why couldn't you simply cut out the center, layer it and insert each fold into the pleats of a previously created one? The circles would be easy to decorate..... and who says it has to be a circle? A square, a rectangle, a triangle would easily work as well... and decorated again with simple pre-made scrapbook embellishments and/or stickers. Those banners that drape below, could easily go over top. Personalized with any words related to themes, seasons, occassions. I couldn't resist thinking of the possiblilities to use some stamping techinques either. Polished stone backgrounds, embossed crackles.... especially embossing and glittering! The glitter truly makes them spectacular! What about glittered diecut shapes? Can you see stars and flowers shapes within the designs? A couple holes with string, ribbon, and fibers strung through and you've got one amazing Christmas ornament! A set of 3, and yep, it is a gift! I then remember the little matchbox that I originally discovered the medallions upon, and my mind quickly raced with a few more ideas. Creating a shrine inside of a matchbox, adding a glitter outline shape to create a miniature shadowbox within. Add in ribbon adhered to the edges and more ornaments abound. Well, the box idea is a great one and we all know that they come in a variety of shapes and sizes in paper mache. I started envioning them in the small circular sizes, decoupaged with papers, a paper medallion used as a collar for a styrofoam snowball decorated with a face and a cone hat! A larger wooden bead would also work! and robbins, fibers, strings adhered around them add an additional decorative touch. Even a small hole, made in the top layers and punched through the lid would allow you to create yet another ornament! Adhere the inside top of the lid to the top of the box and viola, it wouldn't come apart! Of course, they would have to be glittered!
The stationery suitcase.... well as much as I'd love to be able to create one these for all the ladies on my list, it simply isn't going to happen. But then I remembered that Stampington? possibly, or Mirkwood maybe ?, anyway one of them offered a template for a suitcase created from paper. {I'll post again when I rediscover it!} Any container would work, a paint can, a wicker basket, a lid to a box or a box itself. Of course it would need decorated!!! I thought about how a garland or a banner would look hanging along the upper edges, or a paper medallion decorating all four sides!!!
The collages....... well, in all honesty, these would be the easiest and the fastest for me to create. The supplies are inexpensive enough, I've an entire box of the frames as I picked them up a few summer ago while I was at the flea market! I remember Linda and I went in on the box for a $1 each and split it..... I wondered then what the heck will I ever do with 48 frames? Well, once we split them, it was 24 and I've gave some away. Those frames are neat! as in they are deep! I could even possibly turn them into a shadow box as the back opening is larger than the front. Of course, I'd have to trim the back easel section of the frame to fit the front opening and remove the photo turns from the frame. I thought a piece of matboard frame could easily be hot glued to them and decorated as well. The illustration boards aren't too expensive and are available usually in a package of 4. I've a lot of paints on hand and tissue paper! Use my own stamps and another gift is born!
Lots of ideas and inspiration.... and knowing that if I don't write them down, create sketches, they will quickly vanish... so that is what the purpose of this post is about: a gentle reminder! {and perhaps to inspire someone else....}
I got to brainstorming and realized that some of these things could be created in a big way only in a smaller version and using some additional things to personalize them and speed up the process.
The garlands: either the ring style of the gratitude or the artful banners can be made smaller. Can you envision them in a smaller scale? What about a 1/2" x 3" style for the ring one? You could cut a lot of them out of a single sheet of printed paper and cardstocks, use colors that would match the recipients decor and personalize them by themes. If I used staples to create the rings, they would go together fairly quickly and creating a 4 or 5 foot one which could drape over a curtain rod, dress up a shelf, or add a ribbon or fiber hanger to them could be hung on a wall using simple push pins, hung over a picture grouping on a wall.
The artful banners could also be created on a smaller scale and I think that they would be adorable hanging on the edge of a shelf. The banner style itself hosts a lot of possibilities, what about using circles, diamonds, a rectangle with a triangular cut out to resemble the cut ends of ribbons? Again, very easy to personalize! Colors, themes, sizes... A package of scrapbook embellishement would assist with the smaller scale and stickers for images wouldn't be too awful expensive, right?
The paper medallions.... oh how I am loving these! So easy to create and they can adorn almost anything! I can even see them added to the joined spaces between the artful banners, on a gift tag, a gift bag, as a jar topper. Paper choices are fantastic, anything from vintage documents, wallpaper, sheet music, book pages to simple scrapbook printed papers. Then my mind began to wonder with even more possiblities... can you see them layered? This puzzled me for a moment as I realized how they are folded and the thickness of the center when it dawned upon me that as it being folded and before it spread out, why couldn't you simply cut out the center, layer it and insert each fold into the pleats of a previously created one? The circles would be easy to decorate..... and who says it has to be a circle? A square, a rectangle, a triangle would easily work as well... and decorated again with simple pre-made scrapbook embellishments and/or stickers. Those banners that drape below, could easily go over top. Personalized with any words related to themes, seasons, occassions. I couldn't resist thinking of the possiblilities to use some stamping techinques either. Polished stone backgrounds, embossed crackles.... especially embossing and glittering! The glitter truly makes them spectacular! What about glittered diecut shapes? Can you see stars and flowers shapes within the designs? A couple holes with string, ribbon, and fibers strung through and you've got one amazing Christmas ornament! A set of 3, and yep, it is a gift! I then remember the little matchbox that I originally discovered the medallions upon, and my mind quickly raced with a few more ideas. Creating a shrine inside of a matchbox, adding a glitter outline shape to create a miniature shadowbox within. Add in ribbon adhered to the edges and more ornaments abound. Well, the box idea is a great one and we all know that they come in a variety of shapes and sizes in paper mache. I started envioning them in the small circular sizes, decoupaged with papers, a paper medallion used as a collar for a styrofoam snowball decorated with a face and a cone hat! A larger wooden bead would also work! and robbins, fibers, strings adhered around them add an additional decorative touch. Even a small hole, made in the top layers and punched through the lid would allow you to create yet another ornament! Adhere the inside top of the lid to the top of the box and viola, it wouldn't come apart! Of course, they would have to be glittered!
The stationery suitcase.... well as much as I'd love to be able to create one these for all the ladies on my list, it simply isn't going to happen. But then I remembered that Stampington? possibly, or Mirkwood maybe ?, anyway one of them offered a template for a suitcase created from paper. {I'll post again when I rediscover it!} Any container would work, a paint can, a wicker basket, a lid to a box or a box itself. Of course it would need decorated!!! I thought about how a garland or a banner would look hanging along the upper edges, or a paper medallion decorating all four sides!!!
The collages....... well, in all honesty, these would be the easiest and the fastest for me to create. The supplies are inexpensive enough, I've an entire box of the frames as I picked them up a few summer ago while I was at the flea market! I remember Linda and I went in on the box for a $1 each and split it..... I wondered then what the heck will I ever do with 48 frames? Well, once we split them, it was 24 and I've gave some away. Those frames are neat! as in they are deep! I could even possibly turn them into a shadow box as the back opening is larger than the front. Of course, I'd have to trim the back easel section of the frame to fit the front opening and remove the photo turns from the frame. I thought a piece of matboard frame could easily be hot glued to them and decorated as well. The illustration boards aren't too expensive and are available usually in a package of 4. I've a lot of paints on hand and tissue paper! Use my own stamps and another gift is born!
Lots of ideas and inspiration.... and knowing that if I don't write them down, create sketches, they will quickly vanish... so that is what the purpose of this post is about: a gentle reminder! {and perhaps to inspire someone else....}
Monday, August 28, 2006
Running behind and other artful thoughts....
I haven't made the time to work on my gratitude garland the last two weeks so my goal for this week is to create some new links for it. I believe I stalled with this project after I decided to make the last several links a bit wider and now I'm not so certain that I like it, LOL! I thought about removing them only to later decide to leave it alone and keep adding to it. Perhaps, periodically adding in a wider link or two. I'm certain that it will all work out in the end so I'll continue creating them. So adding to it is one my things to create list for the week. I'm a bit ahead of the game as I've been writing a list of gratitudes as I realize them so coming up with the gratitude itself won't be a problem.
I've also been considering creating something new. Creating either an altered collage playing card deck or an alphabetical collage complete with punctuation and numbers 0-9 . I intend to work on this either once a week or every two weeks. I had this idea that if I started something like this I'd have 52 or more pieces of artwork that I could later add to pages in a handmade book. I realize that I've hesitated to start working on it as I know that the upcoming holiday season will more than likely interfere with my intentions; only to quickly realize that if I don't begin it soon, I probably never will! Therefore, I've decided to dive into creating something of this nature, figuring if I slip up and miss some weeks here and there it wouldn't really matter much to anyone but me.
I have this vision in my head of the type and style of artwork that I'd like to be creating but once I assemble all my supplies and begin to work an entirely new style emerges. Perhaps it is more in my haste to see something actually finished that I end up with some things that aren't what I expect or envision. So, I believe it is time for me to slow down some and take the time necessary to experiment more and play with my ideas. Even if I later decide not to share that artwork with anyone, my goal is to simply improve in my papercrafting, rubberstamping, mixed media skills and assist me to discover just what my own style is. I am really desiring to get those visions out of my head and created onto paper and various other objects, I know that it is there, within me, it is just figuring out how to create it and bring it out. Hopefully, simply creating more and taking more time will assist me with that.
I've also been considering creating something new. Creating either an altered collage playing card deck or an alphabetical collage complete with punctuation and numbers 0-9 . I intend to work on this either once a week or every two weeks. I had this idea that if I started something like this I'd have 52 or more pieces of artwork that I could later add to pages in a handmade book. I realize that I've hesitated to start working on it as I know that the upcoming holiday season will more than likely interfere with my intentions; only to quickly realize that if I don't begin it soon, I probably never will! Therefore, I've decided to dive into creating something of this nature, figuring if I slip up and miss some weeks here and there it wouldn't really matter much to anyone but me.
I have this vision in my head of the type and style of artwork that I'd like to be creating but once I assemble all my supplies and begin to work an entirely new style emerges. Perhaps it is more in my haste to see something actually finished that I end up with some things that aren't what I expect or envision. So, I believe it is time for me to slow down some and take the time necessary to experiment more and play with my ideas. Even if I later decide not to share that artwork with anyone, my goal is to simply improve in my papercrafting, rubberstamping, mixed media skills and assist me to discover just what my own style is. I am really desiring to get those visions out of my head and created onto paper and various other objects, I know that it is there, within me, it is just figuring out how to create it and bring it out. Hopefully, simply creating more and taking more time will assist me with that.
Tuesday, August 08, 2006
The inspiration.....
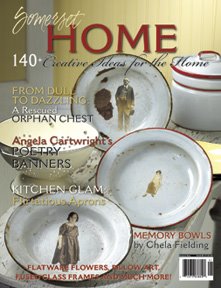
Here on the cover of Somerset Home is where I found my inspiration. I tried to sketch the man with the hat in the top soup plate and the lady in the middle one. There are a bit of differences between the two that I've learn to accept while I am sketching. Sometimes a stray pen mark leads the way, I've simply learned to try to follow along vs. ditching the entire piece, LOL!
One thing that is for certain, is that I learning to embrace the littlest of imperfections within my artwork. I am opening up more, becoming more relaxed, and allowing a lot more room for mistakes within my work. I love that about the process, I'm realizing it is okay to be a bit different and that often it adds a character to my artwork that I wasn't aware even existed.
Anyways, I'm sketching more in the hopes of improving. I may decided later to color these with my color pencils. Some day they will find their way into my journals.
Thursday, August 03, 2006
Additional thoughts and ideas....
While designing my deco, I realized that a lot of my sketches for ideas to use within it could also be used for cards fronts. Since I am running a bit low on my "Thank You" card stash, I decided that I'll make those sketches multi-purpose.
I also trimmed a bit of the ends of my fabric purchased to make the quilt I've been desiring to start. Unfortunately, my desire got put on hold for a while as Shawn wanted it back to make bags for a Corn Hole game. I'm now waiting patiently to get it returned back so that I can start in. Anyways, I figured while I was sorting through some of my stash of supplies, I match up some cardstock colors and printed papers to match those in my fabric. I've one idea for what I'll use them to create; a couple 2007 Perpetual Calendars. One to keep and another to give away for a Christmas gift. I haven't began designing them just yet but I've got the calendar printed out and ready to take to be copied!
Ahhh, my creative life is good, once again.... {smiles} Oh! and all the left over scraps from creating the deco... they'll be perfect to use in my Gratitude Garland!
I also trimmed a bit of the ends of my fabric purchased to make the quilt I've been desiring to start. Unfortunately, my desire got put on hold for a while as Shawn wanted it back to make bags for a Corn Hole game. I'm now waiting patiently to get it returned back so that I can start in. Anyways, I figured while I was sorting through some of my stash of supplies, I match up some cardstock colors and printed papers to match those in my fabric. I've one idea for what I'll use them to create; a couple 2007 Perpetual Calendars. One to keep and another to give away for a Christmas gift. I haven't began designing them just yet but I've got the calendar printed out and ready to take to be copied!
Ahhh, my creative life is good, once again.... {smiles} Oh! and all the left over scraps from creating the deco... they'll be perfect to use in my Gratitude Garland!
Wednesday, August 02, 2006
Artful things.....
Lately I've been thinking about some of the artful things that I'd love to begin working on and creating. To assist me to stay on track, I've decided to begin a list here on my blog. Just as I keep a written one in my personal journals, let's call it, "My Personal Creative To-Do List".
- Continue working on my Gratitude Garland
- Swap more ATC's
- Begin working on some painted backgrounds, paste papers, etc. for use in my artwork
- Start once again on my Art Journal, and, last but not least
- I'm feeling ready to do yet another Deco soon.
I have some other goals, such as submissions for publications, but I am certain that I can combine some of them into some of the to do list that I've listed above. I am continuing to work on creating myself some worksheets to assist me with the process and I've filled a journal halfway with a lot of thoughts and ideas for artwork and articles. Time will tell where that will lead me.... for now, I'm content with the above list and creating some, "Thank You" cards.... my stockpile is running low.
Another thing that has been really fascinating me is I'd love to once again have a penpal. Maybe more of an artful kindred spirit in which to write handwritten letters and to share artwork with more on a deeper personal level than that in which round robins and swaps provide. The only concern that I really have, is knowing that I don't desire to bite off more than I am able to chew, I'm still in the process of tying up a few previous obligations and loose ends, and knowing that the holidays will soon be approaching which means making some handmade items for as our finances could use any boost that I can provide them with. Perhaps, after the first of the year is best before I embark on yet another "to do" list. {wink}
Subscribe to:
Posts (Atom)