Saturday, August 05, 2006

Another FAT Book.....


Okay, maybe not a book, but a binder, is my Artist Trading Card Binder. I've been swapping Artist's Trading Cards for over 3 or 4 years now with a multitude of online friends and perfect strangers so my binder is beginning to burst at the seams.... Ok, I am exaggerating again, but it is definately growing FAT! I am intending to search for another one like the one I have or something similar as I love it! I'll have to capture a photograph to share with all of you one day.

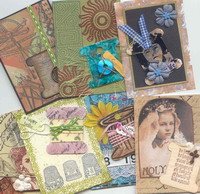
These ATC's {Artist's Trading Cards abbreviated} were received via snail mail yesterday. They were created by a group of lovely ladies with whom I've been in contact with for several years now. I love how each ATC reflect each artist's artistic style and those who's ATC's a just a little different from their usual style of creating. Having swapped with this group for years, it is also exciting to see how much each of them have grown in their stamping, use of mixed media, and the learning of new techniques and ideas. Each and everyone is an inspiration!

For those new to this concept of Artist's Trading Cards, the standard size is 2 1/2" x 3 1/2" and swaps maybe themed or open to interpretation. A variety of mediums are used in creating them; simply "Google" ATC's or Artist's Trading Cards and you will discover a multitude of galleries featuring them. Everything from kids who create with crayons, and others who create with graphite and colored pencils, pen and ink, rubberstamps, and a whole variety of artistic mediums. Over the years, I have discovered most ATC artists are more than happy to swap 1 on 1's, or 2 on 2 swaps, so shoot an artist off an email inquirying. Rarely will you get turned down unless another artist is a swap participant, very into mail art, or involved in a personal creating project; some time life throws all of us an unexpected curve ball so don't take the rejection to participate personally. After the beginning of the New Year, I would like to do more one on one swaps, so if you are interested in adding one of my ATC's to your collection, click on my profile link and shoot me an email. If I am not to involved or busy with life, I'd love to swap one or two with you! {{yes, that was a shameless self-serving plug!!! *big grin*}}

My Art Idea Journal RR...

Ah, the journey with this project continues. If you are new to reading my blog, you may not be aware of this artistic endeavor so I will summarize it a bit for those of you who fall into this category.

In February of last year, one of the online groups that I participate within, a member suggested we do an art idea journal after seeing so many varieties of paper art techniques displayed within some of the previous swaps and mingles held there. Regardless to say, interest in participating in this sprang up quickly and by the time the poll was over, 17 participants signed up to join in. A Yahoo group was established for communication, which has been wonderful over the course of the last year and a half! Discussions were held and from those discussions, two groups were formed. One was a group who desired to send loose pages for a journal to be bound by the artist when the swap ended and another group desired a lightweight bound journal to actually be sent out. Some participants, amazingly to me, signed up for both groups!!!! {I don't know how they did it as many keep participating in swaps and challenges and a variety of personal creating while involved! which AMAZED me even more!}

After the participants for each group was listed, documents were created that listed the participants and their personal information for future contacting, a rotation was established, and each participant set out to creating their own Art Idea Journal to be sent.

{You can find some pages that I created for mine in my archives: they'd either be in Feb. or March of 2005} In March, we embarked on this journey. Journals began being mailed, artists created within the pages and filled in the sign in sheets and signed their artwork. Communication was, and still is, vital to this process. Posts were made by each participant when a participant's journal was mailed, to whom, and when received. Rarely, did the moderators of the group have to step in and make inquiries or suggest a journal be sent on. One member was so kind as to set up a database where each participant could document who's journal they had in their possession, to whom it was mailed, and when; as well, an accumulative list for all the journals that participant has worked in. This greatly assists each and every one of us and all participants were excellent about using it! Fear that a journal would be lost in the mail was the greatest challenge but I am happy to report that to date, no journals have been misplaced. {Lord, I hope I don't jinx that!}

Anyways.... {geesh, I use that word a lot! LOL!I assure you that it is a "learned behavior"' anyone who knows Don; knows what I am saying! :)} I recently heard that my journal is amazing! It is approximately 5"x7" or somewhere there abouts and I hear it is FAT! A lot of the ladies participating in this Round Robin, tell me it absolutely beautiful! I can say that I have seen some of the pages created within it. They were from scans that others uploaded, but I can also say, that the scans shared within that group, in no way compare to actually holding any one of these journals within your own hands. Each and everyone is unique in some small way, even if some of the artwork featured within was created 17 times!!!

Well, I am happy to say that the participant who mails to me recently received a journal. After she is finished with her artwork, it will be on its way to me! That means I'll soon have a journal to play in and after that....... I'll only have 3 more to create in!! Oh, Happy days......... {This also means my own journal is closer to making its way HOME! I'm so exited to actually see it and hold it within my hands!!!!}

Oh, and for those of you blog readers who aren't familiar with swaps, Lisa Vollrath of www.lisavollrath.com has written an excellent tutorial on mail art which will help you with the idea of what a swap is. However, it is important to note that the swap hostess may establish her own rules, be certain to following them carefully and to the letter!

A "Mingle" is another form of a mail art swap, except the participants of the group are paired up to exchange artwork. I hope this information helps someone. To find swaps to participate in there are a variety of groups on Yahoo, MSN, and Google's eGroups that accept new members in a variety of categories. You're certain to find something that suits your interests, crafts, and hobbies. If you cannot find a group that works for you, why not invite some of your friends and begin your own? I assure you, you will love it!!!!

Drop Spine Box Tutorial

I have an excellent Drop Spine Box tutorial to share. First, you will have to create an account and log in to view the video tutorial. After loading, it demonstrates just how easy a Drop Spine Box is to create. It also provides some great bookbinding tips that you can use again and again, should you ever decide to venture into Book Arts. After you watch the video, be sure to download the Drop Spine Box .pdf and save it for future reference.

To reach the tutorial, click on the title, "Drop Spine Box Tutorial" above.

I've made these myself many, many years ago and cannot tell you how easy they really are to create. The kit shown in the video is a Club Scrap kit, however, if you are desiring another pre-cut kit, http://www.hollanders.com/ offers them as well. Note: Be sure if you order your first one from them, you get the instructions; not all of their kits offer them or use this tutorial.

I do have one kit I've created on hand, if anyone desires those measurements only, I'd be happy to look them up for you. I'm certain if it the same as either of those above since it has been many years ago since I've created it. I keep it to use as a template with my own bookboard and save it for an emergency gift. I also have the measurements saved and written down in a resource manual I keep, just in case!

If you are really creative, experiment and play with the boxes dimensions to create a unique one of kind box! I have also used a variety of different clasps and closures on a few of mine.

Here are a few additional suggestions for a few:

  1. Use a genuine bone bead. Sew or glue it securely in place. Use ribbon, string, jute, or fun fibers to create a "loop" to slide over.
  2. Use a large vintage button. Sew or glue it securely in place. {a foam pop-dot will add additional dimension, if desired} Create two holes and thread both ends of string elastic through each hole. Tie or secure to the box while assembling.
  3. Use a metal box clasp. Most woodworking suppliers, such as Walnut Hollow, carry them.

After your Drop Spine Box is created fill it up with heartfelt love letters from family and friends, mail art or cards from online friends and swaps, or insert a handmade book. In the tutorial shown above, there is a smaller compartment that is sectioned off shown, it too can be easily re-created for small trinkets and treasures. I also believe these would be perfect for holding a wonderful made altered book with a fictional story line and a small collections from the imaginary journey, or perhaps a shrine encased within. There are a lot of possibilities here but best of all, they make amazing gifts!!!!

Happy Creating and Enjoy! {smiles}

Friday, August 04, 2006

A few links for my gratitude garland


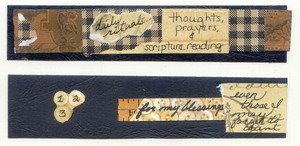
While Don is running errands and working a bit later than usual, I decided to create a few more links. The daily rituals of thoughts and prayers for ourselves, worship, praise, and for others is the easiest for me. The scripture reading could use a lot of improvement, however, I do seem to find at least one online that seems somehow special and relevant for me. The next link uses some symbology again. I find it fascinating since I'm working on such a small scall to come up with something unique for me to use. The 1., 2., and 3. represent the Father, Son, and the Holy Ghost, while I felt the upside down measuring stick was perfect for my journaling which says, "for my blessings" and adds on "even those I may forget to count." I'm certain that they will be many.

Thank You, Sandy and Linda


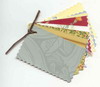
For the wonderful wallpaper samples! I can definately see myself ordering some soon. Your wonderful promptness on getting this out in the mail is grately appreciated! I wish you both a successful venture and cannot wait to see some of the designs my wonderful blog friends will come up designing with them!

I'm grateful for gratitudes.... {smile}


These are the next three links that I created today for my Gratitude Friday's Gratitude Garland. I'm excited that I am continuing to work on creating it and amazing myself as I continue to watch it GROW!

Where my thoughts have been....

Lately, I've been in a "nesting" stage, maybe it's from all the "cabin fever" that we've been experiencing from the recent heat wave, but whatever the reason is... I'm lovin' it! My mind has been racing with thoughts and ideas for our home, and I've been one heck of a cleaning and cooking mood, which as Martha Stewart would say is, "a good thing!" {At least Don is believing so...}

Over the years, we done quite a bit of major home remodeling and bigger decorating projects like painting walls, purchasing the wood flooring for our living room {which has yet to be laid as we're saving for the underlayment. Maybe we could have purchased it many times over already, if we'd stop some of the traveling and purchases here and there, but what fun would that be? LOL!} I guess, my point is that now my mind is spinning with ideas that I have for what I envision our home to be in all "the little details" that make it uniquely ours.

So, I intend to begin focusing more of my attention to doing just that. Focusing on the little things, one area at a time, every day. Whether it is something as simple as decorating our bedside tables, the top of our dressers, lining a dresser drawer one at a time, clearing a cluttered area, cleaning and dusting and decorating it, today I'm making a commitment to myself to start; even if it is only one area at a time, I figure within a week I can have an entire room or a piece of furniture completed! making our home more warmer and more cozier. {I've always heard that it takes only 21 days to make something a habit, so this should be easy to do, even on days when our schedules are busier, such as Don's day's off; surely, I can tackle something small!}

Maybe I should take a picture with my digital camera as I complete this endeavor and add it to my blog. I may make me a bit more accountable and commited to doing instead of simply thinking and talking about doing it. And, who knows, I may encourage someone else to start making their home a sanctuary surrounded by the beautiful things they love!

Well, I better scoot! and go get started, besides I've still a few new gratitude garland links to create today. I've already a few gratitudes written in a list that has been added to. {*until my next post, *Ta.Ta.*}