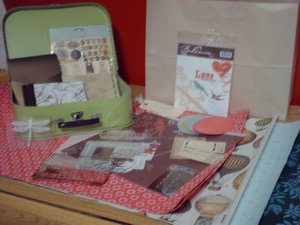
Whoo-hoo! My Stampin' Up Label Punch Tin arrived via the big brown truck! It was like Christmas, opening that box! {Thank you, once again, Sue for assisting me with this order!} The tin itself is beautiful! A gorgeous turquoise blue with a thin acrylic window to peek into the contents inside. Of course, I just had to try out that punch and how easy it is to punch these things out... even using Bazill cardstock. I'm excited to get those stamps trimmed soon so that I can use them right away. They will make an amazing item to add to my Stationery suitcase. Speaking of which....
I ventured out to the studio last night, poking around here and there, in search of something... which escapes my mind right now; anyways........ I was thinking of items that I'd like to add to my suitcase, writing paper, thank you cards, envelopes, labels, tags, ect. and while searching I came across some items that will be perfect! Some large notepads of paper that are currently just notepads that I can decorate up in some way. Some pink, green, and blue envelopes. My OH Boy labels. Adding an address book, a small journal for notes, recording correspondance....Well, I'm sure you get the picture..... my mind began racing at all the possibilies of putting this together creatively as I add to it. I am loving the idea of having everything in one spot that I need for corresponding, right at my finger tips. The only dilemna I can think of will be deciding where to keep it, LOL! Do I want in the house, displayed openingly where I'd be able to access it easily and possibly remember to do more letterwriting? or put it out in the studio and use it exclusively for my artistic endeavors? I believe I'm leaning more towards the first, but who knows, I may end up loving it so much, I'll have to purchase another one, LOL!!!!! I tell you, that suitcase is absolutely adorable!!!!
Speaking of corresponding.... geeeshhh.... my mind's wandering. I have the napkin swap ready to be taken to the post office tomorrow. I need to bind up my deco tomorrow, prepare it for mailing to Linda, and take it along with me. {I hesitated to send it today, in hopes that one of the art idea journals would arrive and I could quickly finish up my last step of the process to take it along with me.}
Also, tomorrow's the day for the notification regarding the Variety Collage Swap on Swap-bot. I'll finally know who the two participants are that I will be mailing to so I'll be able to check out their profiles, visit their websites, blogs, and/or read about their desires for what they'd enjoy receiving in addition to the items I've already gathered up. I also discovered some additional supplies that I have an excess of while browsing in the studio so I'll add some of those supplies to the packages as well.
My "to do" list is getting shorter, freeing me up some to work more on the art that I desire to create. That sounds sort of strange as I write it, LOL! Not that it is a bad thing, just that since I've drifted more in to rubberstamping, altered books, and mixed media, from creating scrapbooks, I have discovered that I don't create enough artwork for my own enjoyment. Not that I don't like sharing... art is truly intended to be shared with the world; it is just a matter of finding and discovering that sense of balance between what one desires to share and what one desires to keep for their own. I really want to continue adding to the gratitude garland, begin creating some collages, creating more handmade books and sewn bindings, and work on the correspondence suitcase.
I've other thoughts and ideas but for now, I am content to be setting goals once again, and actually achieving them. Of course there is always more that I'd like to do, but I am doing really good at not overwhelming myself with it all at once. Taking it one step at a time and getting things done. Hey, it is working! I'm creating, enjoying, and sharing more than I have in quite some time. {*that is a good feeling!}

Thursday, August 31, 2006
Wednesday, August 30, 2006
Aren't these adorable?
 They are magnets! Don and I visited a local stationery and invitation store called the Imprompto Gallery uptown/downtown today. I haven't been in this particular store for quite some time, actually before the store re-located. I was truly impressed with the product selection and merchandise available and will have to remember this for a local resource.
 These magnets were also available in keychains; in a wide variety of monograms. I choose the two "P's" for Partly Paper and will add them to my MM Magnetic chalkboard within the studio. They are actually very stainless steel/chrome looking in appearance --- which was hard to actually scan, but I did it!

Tuesday, August 29, 2006
Various other news...
I thought I was doing a good thing yesterday! I went in and backed up some things from my C://drive to my D://drive, prepared some photographs and documents to burn to CD's. Ran my weekly Spybot program, check out my Norton Antivirus, and even ran a Windows Update and upon the computer's restarting, Internet Explorer updated.
Things were going good, at least until I had to re-boot my computer for the updates to take effect. It was then that all my new problems occurred. At first, I thought my computer's monitor was going on the fritz. When I opened Internet Explorer, I immediately noticed some light and medium grey lines on my screens. These lines are especially noticable where there are photographs in .jpgs and .gif's on the screen and where text is. It is so distracting!!!! But for now, I'm dealing with it.
I definately have a love/hate relationship with this thing. I love it when it works; and hate it when something like this happens that seems beyond my geek-ish capabalities. I've resigned myself to calling my computer Dr. Gary and letting him figure it all out, LOL! I'm very thankful that in the event that it is something he'd need to take my computer to repair it, that I have the crappy back up out in the studio to at least stay in touch and check my emails. I wondered if maybe I should check for some patches or additional updates and troubleshooting on the Microsoft website......but my problem is when it comes to my computer, I'm a huge chicken! Let's face it, I already know that I have no problem messing it up! Ahhh, such is life!
Things to do.... {A list to keep me focused}
- Prepare the napkin swap for mailing, {I got sidetracked!}
- Finish preparing the Variety Collage Packages
These two items are to be postal on September 1st.
- Watch for Vicky's Art Idea Journal to arrive {it is postal from Conneticut! My pages are 80% ready so I'll finish that up.
- Watch for Lianne's Deco {it will be postal one day this week!}
Things I intend to create for my personal artwork:
- Create and get caught up on my gratitude garland
- Continue working on a new journal {I've gotten some watercolor paper cut to size already waiting to be scored and stacked into signatures
- Create the journals book covers
- Create my personal stationery and notecards
A new swap I signed up for:
- 9 ATC's with a postage stamp --- mail out date on or before October 13th
Make a trip to Office Depot for photocoping some ephermera to use in the deco and ATC swaps.
And, last but not least, keep a secret! Sssshhhhh, I didn't tell Don about the Collage sheets I intend to order on Thursday or Friday. It isn't a large order and I am narrowing down the selection. This should keep me busy...... and hopefully out of trouble!!! {*smile}
Yippee!!!! I've been rewarded!
LOL! I know that sounds rather strange... but today, Don rewarded me for staying within my self-imposed creative budget with a trip to Columbus. We visited Peabody's Paper in Granville, where I found some amazing imported papers. The sell them there as gift wrap with a smaller price tag per sheet ---- works for me! The store isn't too big, lots of stationery items, cards, and their primary business seems to be on invitations that they design with you. A neat store, anyways. I intend to create a handmade journal, a stationery and note card set for my personal use with the five sheets of papers I purchased.
From there, we ventured over to On Paper on High Street. There I found some of My Mind's Eye Bohemian Collection in Blossom and Bluebird. The products are offered for sale individually, so I was able to pick and choose what I wanted. I also picked up some scallop ovals in a variety of colors, some doo-dads, charms, ect. I did find a cool suitcase...approx. 9x12 in a beautiful light lime green color. I believe I'll use it to store my journal, stationery, notecards, ect. for my own personal use. While browsing the store, I saw a lot of eye candy and jotted down a few sketches while Don drove. There were also some display ideas that would be cool to implement into storage solutions within my own studio --- I'll be creating some sketches of them tonight.
The highlight of my day was a special order purchase that should be shipped to me within a week! I'll post a photo of it when it arrives, along with a link to the manufacturers website which lists stores located by state and a few online ones that carry it! I'm trying really hard not to spill the beans here, I want you to be as surprised my purchase as I am excited about it!!!! I will say that it is something you'll desire once you see it! {I know, I can be such an enabler! It truly works two ways, LOL!}
I also looked at some silk florals to add to my deco cover, however I decided to pass on them and came up with a better idea while browsing. I'll post a picture of it later as I am a bit uncertain if I desire to add it before shipping it out to the other participants or waiting for it to return home to me. I'm thinking later would be best, so it won't get crumpled and smooshed in the process of mailing it around. I also considered posting some pics of my reward for good behavior but I think I'd rather wait and show you what I create with them ---- which most of my readers would prefer, I'm assured. Besides, it will give me something to work on.... I'm so excited! Now, if only some of my orders would show up in my mailbox!!! The anticipation begins........
Monday, August 28, 2006
Radiant Pearl backgrounds
 Earlier this week, I was bitten by the "I gotta create" bug. Having some mixed emotions regarding the gratitude garland, I decided to wait those feelings out and see what evolved. I considered creating some new faux-postage but the thought of having to drag various rubber and inks into the house only to return and organize them once again later quickly shot down any hopes of that happening. {I really NEED A/C in the studio!}
 So, I ventured out to the studio just to see what I could grab to work on inside with the least the amount of supplies needing to be taken inside when I remembered my radiant pearls. I haven't played with these in so long, it took me a moment to remember what supplies I'd need to work with them. One idea after the other emerge, each involving more and more supplies, when it hit me! Just take that pots of radiant pearls and a few sizes of stipple brushes, I could create some backgrounds for artwork to be added onto later. So that is what I did.
These are two large watercolor sheets of paper, both measuring 9 3/8" x 12 1/2" so this is just a sampling of them. Unfortunately the scans of these do not do them any justice and you cannot see the twinklin' radiant effect that they have in reality, but here they are anyways. A blank canvas reading for artwork to be added to.
Running behind and other artful thoughts....
I haven't made the time to work on my gratitude garland the last two weeks so my goal for this week is to create some new links for it. I believe I stalled with this project after I decided to make the last several links a bit wider and now I'm not so certain that I like it, LOL! I thought about removing them only to later decide to leave it alone and keep adding to it. Perhaps, periodically adding in a wider link or two. I'm certain that it will all work out in the end so I'll continue creating them. So adding to it is one my things to create list for the week. I'm a bit ahead of the game as I've been writing a list of gratitudes as I realize them so coming up with the gratitude itself won't be a problem.
I've also been considering creating something new. Creating either an altered collage playing card deck or an alphabetical collage complete with punctuation and numbers 0-9 . I intend to work on this either once a week or every two weeks. I had this idea that if I started something like this I'd have 52 or more pieces of artwork that I could later add to pages in a handmade book. I realize that I've hesitated to start working on it as I know that the upcoming holiday season will more than likely interfere with my intentions; only to quickly realize that if I don't begin it soon, I probably never will! Therefore, I've decided to dive into creating something of this nature, figuring if I slip up and miss some weeks here and there it wouldn't really matter much to anyone but me.
I have this vision in my head of the type and style of artwork that I'd like to be creating but once I assemble all my supplies and begin to work an entirely new style emerges. Perhaps it is more in my haste to see something actually finished that I end up with some things that aren't what I expect or envision. So, I believe it is time for me to slow down some and take the time necessary to experiment more and play with my ideas. Even if I later decide not to share that artwork with anyone, my goal is to simply improve in my papercrafting, rubberstamping, mixed media skills and assist me to discover just what my own style is. I am really desiring to get those visions out of my head and created onto paper and various other objects, I know that it is there, within me, it is just figuring out how to create it and bring it out. Hopefully, simply creating more and taking more time will assist me with that.
Saturday, August 26, 2006
I've been working on my Variety Collage Supplies contributions...

Since I am little sore today from holding and carrying Alexxis around yesterday, I decided to take a break today to focus on the Swap-Bot Variety Collage Supplies contributions from me. I've managed to partially fill a gallon size zip lock with approx. a 1/2" of paper! Some printed, some vintage, consisting of cardstock, mulberry, vellum, embossed and imported handmade to wallpaper samples. I'll be heading to the studio tomorrow for some foreign text, sheet music, , maps , ledger papers, hand-tinted images, old tickets and receipts, and as well as gathering up some embellishments such as vintage buttons, lace, fibers, ribbons, brads, beads, buttons, and game pieces to add. I also burnt 2 Vintage Image CD's from images I have in my stash and some I've found online. After burning the cd's, I thought I should create a little folder to hold it and protect the cd while in the mail. I'm almost ready for this swap..... and will be mailing it out ASAP once notified to whom I will be sending it to. Now, I'm off to package up a napkin swap! {*tootles*}
Friday, August 25, 2006
Look whose visiting with Grandma....
 I just captured this photograph of Alexxis while she is taking a nap. She is getting so big... she takes up half of my loveseat, LOL! as she is so long! She rolls over now and it trying her darnest to sit up all by herself. When I see her it is so hard to believe she is 4 days from being 4 months old!
Wednesday, August 23, 2006
Yesterday's journey...
Don's books didn't come in at Barnes and Nobles yesterday so we will be making a trip back over to Ontario sometime this week to pick them up. Upon leaving the bookstore, we had a nice quiet lunch at Fazzoli's, then stopped into see Peggy at Scrap and Stamp Ink. It was great to catch up with her and hear about the wonderful vacation that she'd taken recently to visit with her mother. {Becky, I soaked up a few hugs for you! LOL!}
Afterwards, we headed to Hobby Lobby where I behaved myself! and only purchased the necessary adhesives that I needed. It turned out to be good timing, too, as they were 1/3 off and I purchased a jar of rubber cement to try a stamping technique shared in the recent ATC technique swap. Also, on sale, were their rubberstamps! but unfortunately I spent my alloted craft allowance for the month when I placed an order for the SU Label Punch Set Tin and another online order from Above the Mark. {Boo!Hoo! for there were some adorable House Mouse images available.}
I didn't always have a "allotted amount" of money to spend on craft supplies, and "No!" Don isn't forcing me to spend only a certain amount per month, although some of my family and friends may believe he should! This is something that I, myself, have implemented after going through my studio and giving so much stuff away! I am really believing it is a great idea for me as it forces me to really get real about what I am purchasing and is helping me not to impulse shop. So far, it's working!!!
To get back to our day, we stopped by for a brief visit with Sheila before she needed to scoot out the door to pick Dennis up from work. After returning home, Don worked for a few hours and I spent time watching some TV. Exciting lives, no?
Deco's inside back cover

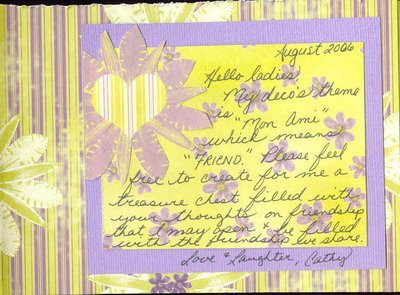
This page shows the truer green in the paisley design that is actually used on the front cover and the cardstock shown in lining of the envy and the quote itself reflect the two colors of cardstock that I used to create additional pages with. The quote reads, "a friend listens with her eyes and her heart understands what you cannot put into words." More fabric, printed papers and Brenda Walton images.
I'll capture a digital photograph of the deco after I get it bound with the pamphlet stitch binding. For today, I'm calling it a day on this project! {*before I get too carried away and have to create another one to send around, LOL! It's been enjoyable!}
A finished page...

Embellished by me using a quotation, torn paper, a photo corner, a piece of fabric and embossed image.


A few of my deoc pages...
I'll will embellish these pages further should none of the deco swap participants desire to create on them. I can envision them with some glitter elements and some quotes on friends and friendship scattered throughout.
Sign In Pages 1 & 2
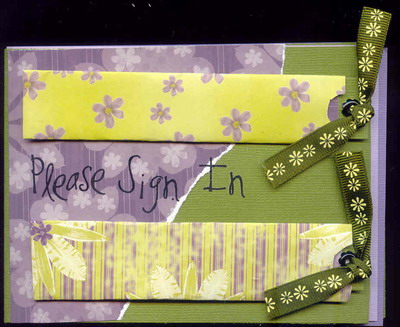
These are my two sign in pages. I used Stampington's Slender Envelope template for the sign in envies. The actual tags that are to be signed are the same green as the background cardstock and have the same purple floral paper show under the "Please Sign In". A black daisy shaped eyelet and the fun ribbon add to the design.
My "Deco Belongs to" Page...

This is in the inside front cover. The handwriting is mine and the tag is dry embossed. I used some sections of K and Co. Brenda Walton's line for embellishing.
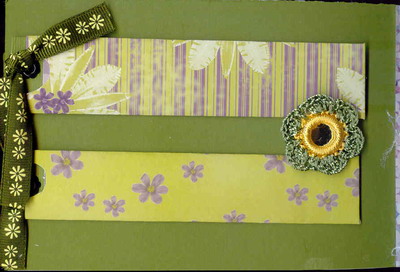
My Deco....

I finished up working on my deco today for an upcoming swap. I had to force myself to stop working on it, unless I complete all the pages myself, LOL! I should mention that there are 8 pages that are un-decorated for my Deco swap participants to create on in a dark and light purple color along with the green I chose, which isn't as bright as green as shown in the scan. This is my deco's front cover. I went in search of a daisy to add to it, however, the only one in my stash is way too big so I'm leaving it without one until it returns to me.
Tuesday, August 22, 2006
Yesterday turned out to be a very productive day for me! I managed to get a deposit slip filled out, several checks wrote and ready to be mailed, a "Thank You" card created for an online friend for placing a Stampin' Up order for the Label Punch Tin! If you haven't seen this stamp and punch set yet, you gotta check it out! Visit the Stampin' Up website @ http://www.stampinup.com/us/enu/default.asp and pull up the 2006-2007 Catalog, it is on page 221, and so darn adorable! Anyways, in my haste, I forgot to scan the card that I created but I assure you it turned out adorable. All of my envies are signed, sealed, and ready to be delivered!
I, also, managed to begin working on my deco for an upcoming swap. I used a beautiful green cardstock {I think it is Bazill's Leap Frog..... or something really similar}, and one dark and one light shade of purple for the actual pages which are 12" x 4" which are folded on the long side to form a 6x4 inch book which I'm planning to do a simple pamphlet stitch to bind. There are probably more pages inside the book than the participants will need but I loved the idea of creating a thicker book so it has 12 pages. I chose some beautiful printed papers in the same color scheme.... Wild Aspargus My husband's paisley, Claire's Cottage, and the Petal Collection. I decided my theme for the deco would be "Friends" and I added in some beautiful quotations. My intro and sign in pages are also created. I used a Stampington template from The Stamper's Sampler Slender Envelope Template http://www.stampington.com/html/tempting_template_jj05.html for my sign in's. I'll have to either photograph it or scan it in to show you, but it is on it's way to being completed..... I desire to embellish it a bit more first. Since, I really loved the color scheme and had a lot of left over scraps from creating it, I am enclosing a ziplock baggie of 4x6 scrap papers for the participants to use inside it for a more cohesive look. I'm hoping that the other participants won't find that too tacky! I just loved the look!!!
This morning, Don has a check up with his Dr.'s office --- a routine visit. While he is away for it, I'll be packaging up Linda's books and slipcase to take along with me to the P.O. later this early afternoon. A quick stop to make my deposit at the bank and we will be heading to Ontario. Don ordered some books from Barnes and Nobles Booksellers and we are heading over to pick them up. I'm also thinking I'd like to stop into http://scrapnstampink.com/, to visit with Peggy and see what's new. Don and I have stopped by several times, however we seem to always miss catching her. Unfortunately, our schedules seem to collide.
I am also planning a quick stop into Hobby Lobby as I need to re-stock my supply of adhevises. {with all this creative frenzy, my supply is running low....... but that's a good thing, right?} and a trip into The Party Supply store to purchase napkins for the napkin swap so I can get those send out later in the week.
This will free me up for awhile to finish on Vicky's pages for the Art Idea Journal, focus on gathering up supplies for the Collage Swap, and work more on my altered book pages and gratitude garland. Well, I've lots to do today so I'm going to check my email and get myself ready to greet the day! I hope everyone has a good one!!! {*smiles*}
Monday, August 21, 2006
Today's agenda...
Is to get myself caught up........
I spend some time last week working on binding the books and creating a slipcase for them for Linda, working on my pages for a soon to arrive Art Idea Journal, and mailing an ATC for a one on one swap.
I put on a pot roast in the crock pot, freeing myself up to focus on some housework, checking emails, and in some groups. I thought I should get prepared for some upcoming swaps so I made a master sheets of those I am participating in. A first for me, was signing up for a swap on http://www.swap-bot.com I used to participate on PostcardX before the site went down and I got too busy to do more of them. Swap bot appears like a good site to participate in some swaps, so we'll see how that goes. To help keep me on tract, I've decided to post part of my creative endeavors here.
- Prepare Linda's books and slipcase for mailing and get it to the P.O. tomorrow.
- Send out a check for a SU order.
- Gather emphemera/collage materials for Swap-bot swap --- mail date of Sept. 14
- Purchase napkins for Our Front Porch Napkin Swap --- mail date Sept. 1st
- Begin constructing my deco for a deco swap and choose a theme
- and, last but not least, is to add more gratitude links to my gratitude garland.
That should keep me focused this week! Oh, and I have some exciting news! I may be getting a kiln for my studio! Don has been looking for one and a friend of ours believes she may have found one for us for $100.00 I've been doing some research on the Precious Metal Clay and what is involved in working with it and to date, I'm loving the possibilities of creating with it...... so we'll see how that goes.
Sunday's update...
I spent my Sunday with the sweetest little girl..... Miss Alexxis. Amber brought her over to spend time with grammie while Chris and her tackled assembling her new high chair. I cannot get over how much she is growing, watching her blossom into herself, and the fascination that she has with the world around her.
I actually caught her playing "peek a boo" with me yesterday as she sat in her Fisher Price Aquarium bouncy seat, cooing at her friends, pretending to watch TV. It was so adorable! She'd coo at her kiss-y fish, glance at the TV, and when I'd look at her sitting there, I'd discover her looking at me. This seemed to amaze her as she look at me and coo, squealing with delight. I'd glance at the TV and then back at her and she'd coo and squeal some more, LOL! She continued this game for a good 15 minutes. She is such a wonderful child, filled with happiness, and for the most part very content unless hungry, tired, or in need of a diaper change.
She'll soon have her first experience with food in just a few short weeks as Amber will be adding cereal to her diet. I believe she is more than ready for it as it isn't too uncommon for her to want to devour an 8 oz. bootle of formula on occassion. She is definately teething, although there is no sign of any teeth coming in yet, her small swollen gums, fingers and hand in her mouth, drooling, and running a low grade fever off and on tell the story.
She tries so hard to sit up all by herself and is so very strong! It shouldn't be too much longer before she's mastered that as she is almost 4 months old now. I'll have to post some pics of her soon --- I didn't take any yesterday as I was just too caught up in spending time with her, devouring every little moment and movement she makes. Between spending time with her, I simply sat and spent the entire day watching movies! Life is definately good!
Saturday, August 19, 2006
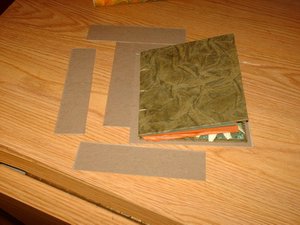
Decorated the slipcase...
 As an after thought, I decided instead of decorating the covers of the books themselves to decorate the cover of the slipcase. Here is a scanned image of what it looks like now. I love the medival feel this has.
For my book, I added an olive green ribbon with a metal rimmed tag covered with a piece of the marbled paper and added my signature and copyright. Now to package up and ship!!!
Friday, August 18, 2006
Making Progress...
I worked last night on creating the Whimsical Writing alphabet for Vicky's Art Idea Journal. My writing page is created along with the step by step instructions. I also created a hand. Vicky asked everyone to create one and from what I hear they are amazing! My hand is actually a tracing of my hand with a henna ink style drawing in pen on the front and the reverse has a paragraph about me. I may add some bling to it and some ribbon or fibers. All that I have left to do is create something with a rubberstamp image, do the magic colored pencil technique on it with the notes for creating and wait to receive Vicky's journal. I'll be adding my pages to it and sending it right back out! I'm certain Vicky will be excited by everyone's artwork in her journal.
I also received word that my own journal is right behind hers and will be heading to Christy very soon. Christy mails me to me so it won't be long before I'll be holding my own journal within my hands once again. It is a good thing I brushed up on my bookbinding skills!
I also received word that my own journal is right behind hers and will be heading to Christy very soon. Christy mails me to me so it won't be long before I'll be holding my own journal within my hands once again. It is a good thing I brushed up on my bookbinding skills!
Thursday, August 17, 2006
Ahhh, what a satisfying day...
All 4 of the books are created and bound! I only made one of the slipcases today as I can create mine anytime. I'm just happy and thrilled that Linda's is drying and will be ready to return to her soon. I need to pick up some gallon sized zip lock bags tonight while shopping to protect the slipcase and the books for shipping.
Tommorow, I'll work on the book decoations for the covers so that I can enclose them into her package which should be ready to ship out Saturday morning or Monday at the very latest. I'm shipping these Priority Mail so she'll be able to have these lovely creations very, very soon. I'm excited to hear what her response is to them; I'm almost certain she is going to love them! {*ahhhh, yep... that is a sigh of relief!}
Tommorow, I'll work on the book decoations for the covers so that I can enclose them into her package which should be ready to ship out Saturday morning or Monday at the very latest. I'm shipping these Priority Mail so she'll be able to have these lovely creations very, very soon. I'm excited to hear what her response is to them; I'm almost certain she is going to love them! {*ahhhh, yep... that is a sigh of relief!}
Step 5
 After half of the slip case is assembled, I flip it over onto the reverse side and trim my corners. The overhanging paper is then glued to the top, the bottom, and to line the opposite inside of the slipcase. You will see the cut areas on the top and bottoms, if it bothers you, additional paper can be cut the width and length of the case and adhered once assembling is finished.
Step 4
 Next, PVA is applied liberally to the reverse side, shown in the last photograph, and flipped over onto my desired paper. Then, I trim it and cut all the necessary fold lines.
Step 3
 Here I used a gummed cloth mending tape to adhere the assembled box together. Gummed linen tape made by Lineco would also work; this is just what I happened to grab out of the studio.
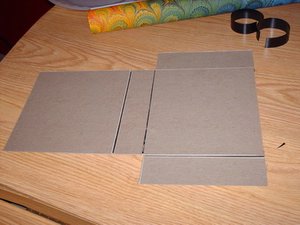
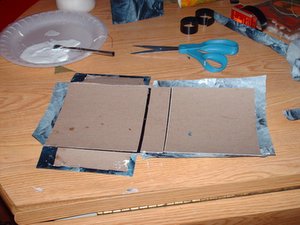
Creating the Slipcase for the books...
 Before I begin cutting, I first have to determine the actual size of the books. My book is just a fraction of a inch larger than Linda'd due to the binding so for this illustration, I'm using it. I determine the height, length, and width of the books. The height and length using mine; the width using both books. I cut 2 side panels, 2 tops {1 actually to be used for the bottom}, and one the length and width needed. You can see in this photograph that there is approx. 1/8" - 1/4" surrounding my book.
A disclaimer...
Normally, a coptic stitch book will contain more than one set of signatures so I'd like to a moment to explain that. How would add more signatures? Before you'd move on to the step where I explain how to attach the back book cover, you would add a signature there.
You would come from attaching the first book cover and add your sigature, bring your needle down into that new signature from the outside to the center of the signature, work your way up to the next hole, pulling your thread taunt once again, and pull it out to the outside center. From here, you take your needle and thread and create a loop through the threads holding the first signature in place. Always be certain that you are creating your loops at the same angle... such as left to right or right to left. This will provide a uniform look to your finished book. Bring your needle back down the same hole in the same signature and up through the top hole and again loop your thread through and add your next signature bring the thread down into it. When you reach the bottom hole you'll catch the previous sewn signature; continue working until all signatures are added, then attach your cover. Your thread should always end inside the book's signature once your last hole in the back cover is attached. Tie off a square knot and trim your thread.
It is truly easier than it sounds, it is something you have to try to believe it could possibly be as easy as it is!!! Enjoy!
Sewing...
 The coptic stitch starts inside the book's center signature and a tail is left. I sew from the inside bottom hole to the outside of the signature. From there, the thread is taken under the book cover and through the cover, where it taken back down into the signature of the book once more. The thread is taken to the center hole in the signature and sewn through the signatures to the outside again where this step is repeated then on to the last hole. When I reach the last hole for attaching the front cover, I start to work on attching the back cover. Since, my thread is in the inside of the signature and I need it outside the signature to begin again, I simply take it through to the bottom hole on the opposite end of the book and repeat the above steps.
Binding my book...
 Binding my book is a bit different since I choose to use a Coptic stitch. I use the same gig for the placement of the book holes only this time I make them in from the left edge of the book covers... approximately 1/4" or so. I use the awl guild on the signatures to create the same template as the pamphlet stitched book.
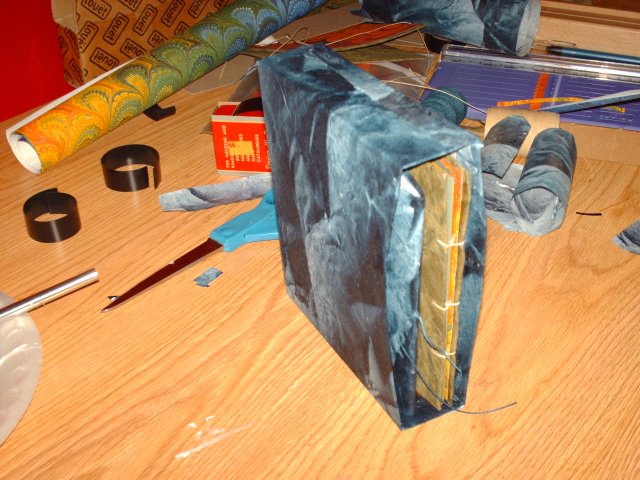
Sewing the Pamphlet stitch.. and the bound book
 Next, I thread my needle with waxed linen thread. I determine the length of the thread by the lenght of the book cover X 3. Starting from the outside center hole, leaving a 2" tail, I sew through the book cover and the signatures to the top hole and come back out. From there, I skip the center hole, go the bottom hole and again stitch in through the book cover and the signatures. I pull the thread taunt, carefully, just enough to be sure it is snug without tearing. From the bottom hole on the inside of the book, I bring my needle up to the center again, using my opposite hand, I move the waxed linen tail on the outside of the cover over so that I can capture the single thread that I previously sewed, and bring my needle and thread back out of the signatures and the cover. Trim the thread with the needle end attached to 2" and tie a square knot after being certain the book is taunt. Here is a picture of the book actually bound.
Preparing the book cover...
 Next, I use the same gig and the Louet awl guide to punch holes in the center of books folding cover. I use the awl guide to line up each of the 3 holes then, use the awl to punch through the book cover.
Binding a Pamphlet Stitch
 I am often asked how I determine the placement of my bookbind holes so I'll tell you. I use a gig. A gig is a simple piece of paper that is the same height as the book and I normally make mine at least a 3/4" wide. This one was just randomly cut. First, I fold it in half along the width to determine a center point. Next, I unfold it, and fold in half length-wise to determine my center hole placement, then I fold each end into the center. Were the folds intersects, is where I make my holes. This photograph shows Linda's book, open to the center of her signatures which the gig in place. I lay it in the Leout awl guide to assist me with getting the holes punch in the center of the signatures.

Subscribe to:
Posts (Atom)