I got it bad, LOL! Always thinking of what I can create next... since I've the Artful Journey Journal RR coming up and I need to tie some loose ends with the remodeling, I decided I could create some faux postage, ATC's, tags, etc. that I can add to the RR pages once received. Hopefully, that will assist me on getting the journals back out in the mail once received. This is an extremely large group with 13 participants so I should have plenty of pages to layer and tip into the Cavellini Journal which I'm saving some $$$ for a later purchase.
I realize I'm probably going to get hard financially with all the new releases from HIA 2005. I figure in approx. 2-3 months I should begin spotting new goodies in my neck of the woods. I'm a also excited to hear that Basic Grey and K & Co. teamed up..... I cannot wait to see what the two of them together teamed up to create!
I really think those of use in the Paper Arts and Altered Arts will find a variety of new goodies to add to our ever-growing and changing stash of supplies. This provides me with a good reason to get to creating and using more of my stash, gotta have room for the new, LOL! What an incentive........ {big grin}

Monday, February 28, 2005


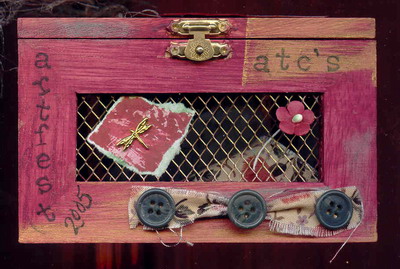
This was really hard to scan in...... it is the ATC Box opened. There is more of Lynne's printed papers in the box lid recessed area. The bag was an RAK from my wonderful friend, Jen. I'm keeping it inside the box to hold my ATC's and Tags right now from ARTfest until they find a home in my artwork.


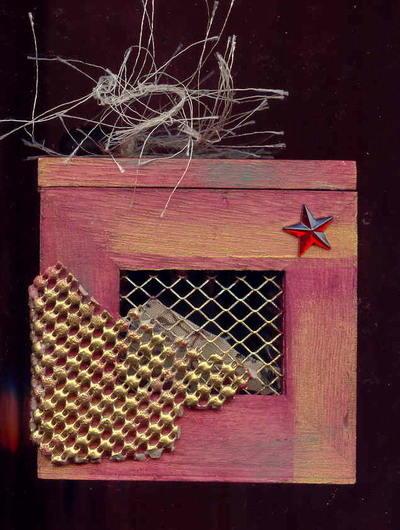

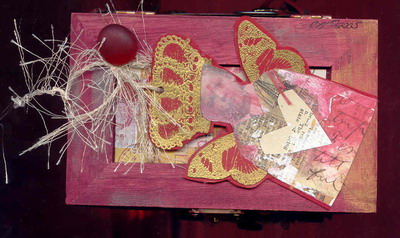
Another class at ARTfest was creating an altered ATC box. I plan to use mine to hold ATC's that I have to trade. Unfortunately, my digital cam isn't working so I had to scan this in..... {bummer!} Anyways, this is the top of the box, Lynne's papers, and embossed butterfly for the wings, and the Crown is from Above the Mark. The paint is the paint I'm painting my computer amoire ---- except it is much darker on the cabinet, I added in gold Brillance ink and bit of green acrylic paint.
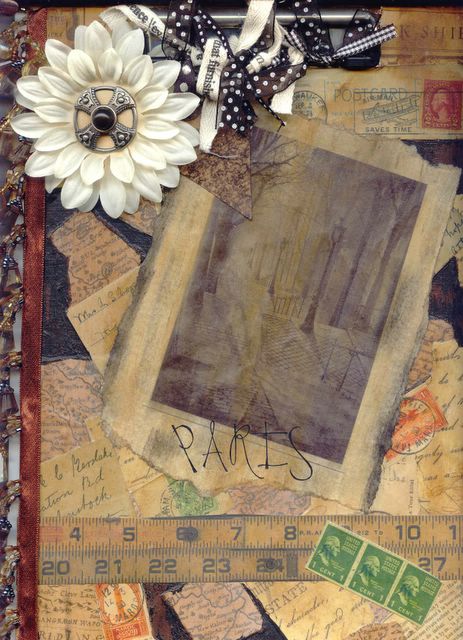
There was a class on altering clipboards, so I cranked this Paris themed clipboard out. Desiring to be able to actually use it, I placed my embellishment off to the left and the top since I am right-handed. The back is actually done as well, however, I want to add another Paris photo and a Eiffel Tower diecut. Have I mentioned I collect Eiffel Towers?
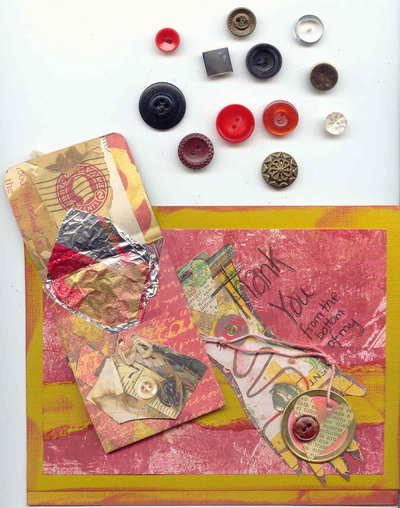
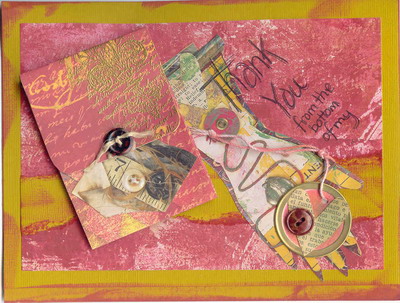
This was for a card challenge where you earned points for the embellishments and techniques used on a card. Desiring to say, "Thank You" to Faith for posting the info re: ARTfest to her blog, I decided to create a card using Lynne's printed papers and more 7 Gypsies so I created the pouch on the left side of the card. I know Faith loves vintage buttons as much as I do so enclosed some within it.

Still reeling with excitement......
from this past weekend spent having participated on www.correspondanceart.com @ ARTfest; meeting some new people, creating art. Wow! While Don worked Friday evening and during the day Saturday, I created some new art for the ARTfest Classes and challenges, participated in some games, and yes! I even won a few!!!! I'm not sure what I will receive as prizes, the suspense is killing me!!! I guess I'll have yet another great mail art day heading my way. :) I do know that their were some awesome sponsors so I am positive the prizes will be amazing!!!
I wasn't aware ARTfest was even happening until early Friday evening when I visited my friend, Faith's blog. Faith had made a reference to ARTfest and provide a link, so off I went to check it out! I'm so very glad that I did as it made my weekend so enjoyable; it was all downhill from there. I'm normally a little more reserved when meeting new people, joining groups, ect. so "jumping right in" is something I'm trying to get better at doing. Once there at ARTfest everyone welcomed me with open arms and I felt as if I had known some of them all my life. Don't you just love people who make you feel that comfortable?
Anyways, I want to get some of the artwork and projects that I worked on uploaded to my blog for others to see. I felt good about the amount and quality of the artwork that I made and I got to use some of those gorgeous Lynne Perrella's printed papers!
Friday, February 25, 2005
Another great Mail day....
My order from Stampington arrived yesterday. I immediately fell in love with the Lynne Perrella Artist Papers. There are some unique papers in this package. Simply looking at them is inspiring! Also, my Gallery 3 arrived within the same package. Lots of eye candy and inspiration.I may just have to try my hand at a few projects contained within this issue.
I haven't had much time for art or for remodeling lately. Don's crazy schedule has thrown me completely off kilter. It makes it really hard to do the things I want to do and still have time to spend with him. It is a small sacrifice to make I'm sure. I am also a little hesitant to start another big project as I know once the RR for Artful Journey Journal begins I'll be busy working on it. So, for now I believe it is time to tie up some loose ends..... finsish painting one shelf within the cabinet, sanding the keyboard pull out and the desk drawer front, then moving on to polyurethaning it so the computer can finally be placed within. There is still one wall in the living room to be painted, after that side of the ceiling is painted as well. Lots yet to be done and finished, so I think small projects will be the artwork that I create. Cards and ATC's.... I can always get to exploring more later....
I haven't had much time for art or for remodeling lately. Don's crazy schedule has thrown me completely off kilter. It makes it really hard to do the things I want to do and still have time to spend with him. It is a small sacrifice to make I'm sure. I am also a little hesitant to start another big project as I know once the RR for Artful Journey Journal begins I'll be busy working on it. So, for now I believe it is time to tie up some loose ends..... finsish painting one shelf within the cabinet, sanding the keyboard pull out and the desk drawer front, then moving on to polyurethaning it so the computer can finally be placed within. There is still one wall in the living room to be painted, after that side of the ceiling is painted as well. Lots yet to be done and finished, so I think small projects will be the artwork that I create. Cards and ATC's.... I can always get to exploring more later....
Wednesday, February 23, 2005
Some thoughts on creativity........
Reading the Making Pearls book has truly reinforced within me that as an artist, I should do what I like, in mediums I enjoy working with, in subjects and styles that I love. I've found that I am most often inspired when doing so and am able to explore a little bit deeper into what it is that attracts me in the first place. By exploring this side of my artistic nature, I've open up to a greater flexibility where I am a little braver with exploring and trying a new technique or incorporating an older technique into my artwork.
It is helping me to stay focused on creating art vs. simply thinking about it. I discovered a long time ago, if I desire to improve in creating art I really need to begin to devote more time into creating. By making that investment in myself and in my artwork, I'm finding that I am for once truly creating projects that I love, that speak to my heart, and that make me happy.
It has taken me some time to actually reach this point in my life where I can truly say that I am trusting the process. That it okay if I desire to try a new technique in a unique way; or even look at the artwork of so many artists and allow myself to study and analyze what it is that attracts me. I've found that by doing so is helping me to discover the style of the artwork I desire to create at this point. It also provides me the opportunity to even imitate the artwork. I am a firm believer that imitation is truly the sincerest form of flattery, however, there is something deep within me that simply must create in a way that it isn't an exact copy of the original. I tend to think I'm more inspired by others artwork than anything else.
I also think surrounding myself by other artists who are as full of energy, creative ideas, assists to inspire me. I've found the majority of artists are generous by nature. They are willing to share their thoughts and ideas, as well as a wealth of information regarding tips and techniques. They inspire me, not only by discussing art --- that is the easy part, but by sharing their passion. I suppose that in reality that is what I want to be, and artist who inspires, one who is willing to be open and honest about the art that I create, one who shares not only the artwork itself, but the passion behind it. I think to really be capable of doing that requires a bit of vulnerabilty, enough to allow you to bear your soul, sharing the ability to simply be yourself, and somewhat of a sense of pride in the artwork that you create. I do not mean conceit, for I realize there is always room for improvement, I mean doing what I love to do and enjoying where I am right now in the journey. I do think it takes some courage to blaze along new trails, to establish your own path. It isn't always easy feeling so open and vulnerable, especially to criticism regarding your artwork; although I realize that art speaks different things to different people. I feel that somewhere in all of this is it important to me to be true to myself, my own emotions, thoughts, and ideas. I believe that in doing so it will assist me to express myself and discover those things deep within myself. A good example of this is my desire to simply let go, to not allow the perfectionist tendencies that I possess to enter into my artwork, to continue working despite a smudge or a smear. I've learned to let go and stop sabotaging my creative forces and my artwork. I'm certain that this book is written in a way that it will grow with me, wherever my creative muse may lead for it is about the creative process. One that is growing, establishing, and becoming as well as one that relates to where I am in the present.
Making Pearls - Living the Creative Life by Jeanne Carbonetti
I'm still reading Making Pearls Living the Creative Life by Jeanne Carbonetti. This book is so wonderful and filled with inspiration, lots of eye candy, and great quotations. However, it is the content of the book that truly causes one to pause, to simply be in the moment, reflecting and getting in touch with one's soul. I am truly impress with the seven stages of the creative cycle and as an artist can see myself within each of them. This book truly is enriching my thoughts, ideas, and feelings regarding my art. I added a link above to amazon.com where on can search inside this book. I'm happy with my purchase!
Tuesday, February 22, 2005
Book Broadcast........
I just picked up Jeanne Carbonetti's book "Making Pearls: Living the Creative Life" I don't know if anyone else has picked this book but she uses references of being creative by nature because we were created by God and refers to the creative process in which we create similar in nature as to how an oyster creates a pearl and the stages it takes much in the same way an artist goes through the creative process. It is an excellent read! Anyways, I think how each artist views their own creative process would make for a great topic and could be used on the pages of this journal, too.
The artwork featured within is simply amazing! and there are a few quotes that truly grabbed my attention. Maybe if someone else hasn't used them in another artist's journal, I will add one with a artistic background.
One of my favorites is, "And the day came when the pain of remaining tight in the bud was greater than the risk it took to open." ~ Anais Nin
How powerful, is that? :)

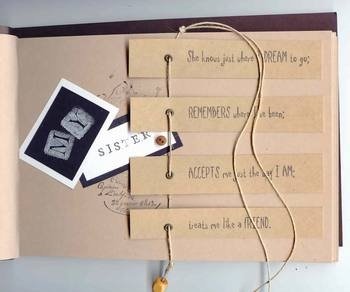
I trimmed the wordsworth sticker to fit on the page and added the Rebecca Sower Nostalgical Booklet for the Sign In pages. I xyron'd the last page, re-inserted the Chicago screw, tied on the fibers and tightened. There are 2 booklets used to make the 22 sign in pages. I do not personally have any preference whether other artists sign in directly on the pages or prefer to layer over allowing a border to be shown around the edges of the tags.


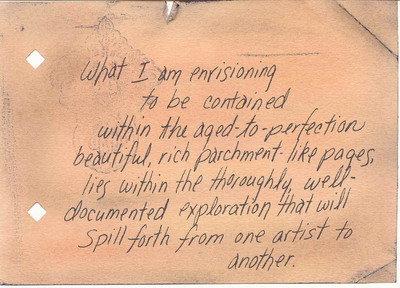
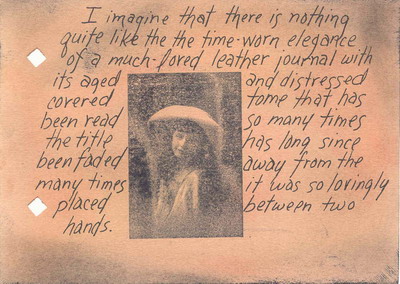
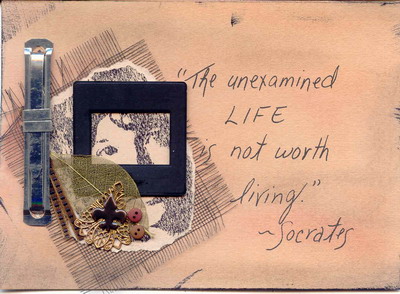
I lightly walnut inked these tags prior to writing and adding pastels. I hope the colors will inspire other artist working in my journal to work with color as well. I am certain that even though I desire the aged-to-perfection appearance, it can be accomplished using color; even add to the beauty of the journal.


Back to doing what I love..... Creating Art!
I began creating my Artful Journey Journal today. Used my Logan Mat Cutter to cut the huge sheets of Mi-Tientes down to 5x& size, and checked the placement for the temporary bindings. Since the file folder binders are a bit wide, I chose to use a diamond shaped hand punch. It worked beautifully!
Since, I already had envisioned what my journal would appear to be, I began to work on it. The next several pages I'll upload will provide you with a visual of the pages that I have created for this project. I'm pretty much an "anything goes" type of person who is open to ideas, suggestions, and such but with this project, I simply jumped right in. The background pages are all the Canson Mi-Tientes in Oyster. I used soft pastels and applied them using a cotton ball to add color. There is some light, ghostly style images that I stamped. I started with Memories black ink and heat set it; it wasn't long before I switched to Stewart Superior India Ink as it dries so quickly, it is perfect for watercoloring without smearing, so I decided if I wanted to add more pastels that wouldn't be a problem.
Since, I already had envisioned what my journal would appear to be, I began to work on it. The next several pages I'll upload will provide you with a visual of the pages that I have created for this project. I'm pretty much an "anything goes" type of person who is open to ideas, suggestions, and such but with this project, I simply jumped right in. The background pages are all the Canson Mi-Tientes in Oyster. I used soft pastels and applied them using a cotton ball to add color. There is some light, ghostly style images that I stamped. I started with Memories black ink and heat set it; it wasn't long before I switched to Stewart Superior India Ink as it dries so quickly, it is perfect for watercoloring without smearing, so I decided if I wanted to add more pastels that wouldn't be a problem.
Monday, February 21, 2005
More on the Artful Journey Journal
Have I mentioned what a wonderful and supportive fiance I have? Today, Don & I went on a road trip where we ended up at Prism's Art Supply. I looked around for 140# cold press watercolor paper and upon finding it remembered the words of an online friend who mentioned how thick this may be.. esp. for layering into an existing journal. So, I looked around for some alternative choices.
Almost immediately a sheet of Canson Mi-Tientes in a beautiful oyster color jumped out at me. I picked up 5 sheets of it in a 95 wt. This is a classic French pastel paper that contains a unique surface grain, smooth on one side and textured on the other. The sheets are 19"x25", acid-free, and are gelatin sized with a high rag content. Sizing is important as it will resist warping and buckling. Another feature of this paper is it penetratible by light and is ideal for oil or soft pastels, graphite, colored pencil, gouache, watercolor or acrylic which means it is versatile for the artists who will be working on it surface. I was so stoked to find it! I picked up some other supplies while there, adhesives, a bottle of Golden's GAC 100, and a new book.
From Prism's we drove in the same shopping center and stopped into Stampland. Norma, the owner, is a wonderful, friendly woman who love to visit and spend time with. Anyways, I picked up a new stamp and a Kaliodoscope Multi-Ink pad. Gotta love that!
But what really made today special; more special than any other day was while we were making the return drive home, Don & I talked about the creation of the Artful Journey Journal. For the first time in quite a while, I felt as if he's finally getting it! I know he understands my desire to create, is supportive of the research, reading, shopping, creating, and yes, even the time it takes away from him, but today was different. He was different. I truly felt for the first time that he understands the passion I have about creating art. He said, "my eyes light up" and "I look so at peace with myself and the world while discussing art." I guess I never realized that nor realized how excited he is to hear me talk about something with so much passion. That just made my entire day! :)
Sunday, February 20, 2005
Rules are made to be broken.......
:)
Ok, not all pages HAVE to be prepared prior to binding a handmade book. However, you will find by doing the desired background technique first, you won't have too many problems going back in and finishing or adding to the pages. A sheet of wax paper larger than the prepared background page can be slid in between pages and will protect the previous pages as you work.
However, there are certain mediums that I would not try that with. Acrylic paints, because I'm messy with them; Watercolors, for obvious reasons, they are WET! Radiant Pearls, because these paints dry by absorption rather than evaporation. Allowing them to dry overnight works the best for me and determining whether to use a sealant/fixative varies per project. You can find the Radiant Pearls by doing a www.google.com search for them; visiting Angelwing Enterprises site at www.luminarte.com; and I found an excellant comparison and informational chart available at http://www.franticstamper.com/radiant.htm
Bookbinding Hints & Tips
When creating books by hand, I've discovered it is easiest to begin by preparing the pages prior to binding the book, although the book is usually created with the binding style desired in mind. Determining the binding style first assists with determining the size of the finished book and the size of the interior pages. I usually prepare my pages 1/8" - 1/4" smaller on the top, sides, and bottom of the book. This allows for the covers to protect the interior contents of the book.
I use a variety of techniques to decorate the pages of my books. In the Journey of 2 Sisters, Colorbox Chalk Ink in Burnt Sienna, Yellow Ouchre, and Amber Clay was stippled using the Toybox Art Stipple Brushes. Toybox's stipple brushes are available in a variety of sizes that are evenly numbered beginning with 2 and going up to a size 8. The #2 brush is perfect for fine detailed areas, whereas the #8 brush is used for backgrounds. Rubberbands can be wrapped around the brushes to gather them together allowing a little more detail to be achieved. The brushes can be used with a variety of mediums from inks to paints such as acrylics, Twinkling H2O's, and Radiant Pearls. I do like to purchase a lot of stipple brushes. I separate mine by medium used and use the same brush within a color family..... reds and pinks, one brush, ect. I always try to work from light to dark when working with them. I have found I have greater success with the satisfaction of a finished product when I begin with the lighter color in the area of greatest interest and work outward from there using a medium shade of the same color and working to a darker shade.
I, also, love pastels. One of my favorite brands are the Koss brands. They are available from www.pollypals.com The box I own contains 48 pastels, includind neon colors. They run $17.95 & shipping. I use a variety of items as applicators, however, I find for background work, I prefer a cotton ball and rubbing to transfer the pastel color onto the paper. I use a regular cardstock, not expensive, normally the Georgia Pacific brand available from most WalMarts {500 sheet count/$4.97}
There are a variety of stamp and ink techniques that can be transferred to the creation of one's pages. The fun is in discovering what works for you and simply experimenting and playing! :)


Subscribe to:
Posts (Atom)