Tuesday, September 30, 2008

The finished Autumn Blessing banner {w/ close-ups}

I used my Sizzix and the scallop edge oval die cut to cut out my various colored cardstock. Then, using Modge Podge adhered some of the previously stamped leaves, a few from some printed paper scraps, and the letter was cut from brown cardstock, then stipple brushed using Black India Ink to provide a bit of an aged look.
The "B" & "L"
"E", "S", "S", "I", "N"
"G" & "S"
Only the "G" leaf was created differently. I pulled it from my stash of previously stamped parts and pieces. The background on it is the Polished Stone technique created using Alcohol inks. TFL! and I hope this tutorial helped to clarify a few things for those desiring to know.

Perfect Pearls

Perfect Pearls are a Ranger Product and can be found here: http://www.rangerink.com/products/prod_perfectpearls_kits.htm
The pots contain dry pigment with a mica ground for that pearlescent appearance and is similiar to Pearl Ex pigments, except with Perfect Pearls no binder, like Gum Arabic, is required as long as you stamp your image first using either The Perfect medium ink pad or a VersaMark ink pad. Here I've stamped the leave using the Perfect Medium.

Using one of the small brushes included in the Perfect Pearls kit, I've picked up just a bit of the dry pigment from the lid of the pots. Can you see it on my brush? I'm all set then, to brush the pigment over the stamped leaf.

This is the results after the larger brush {also included in the kit} has been to used to gently wipe any access pigment away. {I did alter this pic digitally to show more of the shimmery effect.}The photo below is a comparison photographs. The left on the left is the Perfect Pearl leaf, while the two vibrant leaves were created from the background sheet using the Radiant Pearls.


Radiant Pearls continued...

After creating my background, I choose to create a stamped image onto it. I used Stewart Superior's Black India ink to stamp Uncle Eno's face. {This image is from River City Baby BumperWorks} and co-ordinates with the small leaf from them.} Once the Uncle Eno's face image is stamped, I masked it by stamping the image again onto text weight paper, and cut it out. Then, I used the cut image to mask the previous stamped image, while I stamp over using the leaf image.

Above, the leaf has been stamped with the mask in place. The bottom shows the results after the mask has been removed. To use this in my Autumn Blessings banner, I carefully cut out the leaf, applied clear embossing powder, removed the excess, and heat set it.


By heat embossing over the Radiant Pearl stamped background, no dry time is necessary.

An Autumn "BLESSINGS" Banner...

Recently on Two Peas Stamping Board there was a question regarding the similarities and differences of Radiant Pearls and Perfect Pearls. Ann asked, "Are these similiar mediums or are they different Which do you prefer for finishing off an emblossed image and why?" Since I've been familiar with both products in my artwork, I described these similarities and differences.

These two are similar in their ability to add shimmer to an art project but they are two very different mediums.
Radiant Pearls are a shimmering embossable paint. Its similar in qualities to oil paints in blendability, yet produces a watercolored shimmered appearance. RP's are different in that they dry by absorption vs. evaporation, so they are perfect for paper with a matte finish.
Only with the assistance of the #1, #2, and #3 Primary Elements mediums can RP's be used on some items. Here's that broke down:
#1 - soft solution: Made for fabric, leather, and glass. Fabric use requires heat setting.
#2 - medium solution: Made for paper, walls and plastic. Try it on KrytalKraft, acrylic, paper clay, ect. {Note: I personally do not use the Primary solution if stipple brushing the RP's for backgrounds.
#3 - firm solution: Made for wood and polymer clay. You can bake the polymer clay with these solutions.
Watercolor paper works wonderfully well with RP, but should never be wet prior to the application, it just absorbs it well, although not a requirement for use.
Perfect Pearls are more of a mica-based watercolor. They dry by evaporation. So, they dry faster, making a project go faster.
I typically use RP's for backgrounds. It creates the most gorgeous Joseph's Coat and Polished stone techniques, in my opinion. Coating the entire background with clear embossing powder and heat setting assists with the drying time greatly. You can "paint" embossed images with RP's, keeping in mind it dries slowly, often up to 48-72 if not heat embossed. The paint will resist the areas of embossed edges, as well as most supplies used previously within your artwork. It also works wonderfully for some resist techniques. As for preference in use with an embossed imaged, I'd have to say the Perfect Pearls will provide the shimmer effect faster, but will lack the shimmer quality that the RP's would produce. So, basically, it's all a matter of personal preference in what you desire the finished outcome to be. HTH's
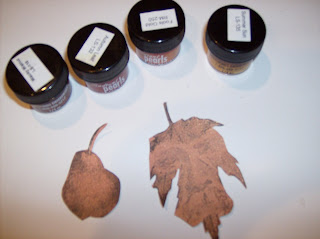
So, I tried to put together a short tutorial, showing both of the products and how I've used them in the creation of my Autumn Blessings Banner. The picture below shows the Radiant Pearls in their jars, and the artwork that I created several days ago and left to air dry.
{it's so very hard to capture the shimmer these actual produce but if you're familar at all with Twinklin' H2O's --- you can imagine that fine sparkly goodness --- its so very similar!}

This photograph which has been digitally altered, shows more of the true colors and the vibrancy of those colors.

I simply uncapped the jars, using a small stipple brush picked up just a dab {trust me all you need is a small amount!} and stipple brushed it onto matte cardstock. Here's the first color application:

and the sheet after a few colors were blended. Radiant Pearls dry by absorption vs. evaporation, so if left alone for 24-72 the results will be similar to the above photographs but for this tutorial I heat embossed using clear embossing powder.

Sunday, September 28, 2008

Kingswood, con't...

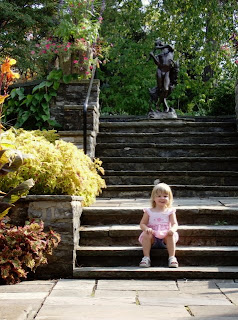
Behind the Kingswood Mansion is a series of steps that lead you down into the Herb Gardens. I was able to capture a couple of photographs as Little Miss flew through here...
and here....

and then down into here....


Do you see what's captured her attention? A fountain, of course! My, how fast those little legs can travel!!!

Jumping with anticipation of playing in the water! Which, of course, we just had to do, before returning to feed the ducks once more. I have to tell you that we had to cut our second visit to the duck pond short... when another little girl shared a bag of buns to feed the ducks and Little Miss decided the hot dog buns were for her instead, we thought we'd better get her some lunch! But before we go, Papa and Alexxis need a quick little rest. The excitement and beauty of nature, perhaps, was a little overwhelming!

More photographs from last Sunday...

Alexxis was fascinated by statue of Pan, the God of Fertility, and I loved the patina on this statue.
Right above where Pan is located is another courtyard and garden. Here's a few of the statues and flowers located there.


Of course, Little Miss wanted to step into the flowers and enjoy a photo-opportunity before we off and running again, on to see this:

{I assure you no flowers were hurt during the taking of this photograph.}


The Kingswood Mansion.

Our Wonderful Trip to the "Duck Pond"...

No matter season we're in, Don and I love to visit Kingswood Center in the Ontario/Mansfield area. It's been one of our favorite places to visit year after year and I honestly never imagined seeing it through the eyes of a child as I got to experience it last Sunday. When Amber called to see if could "sit" with Little Miss while the went to do some shopping and have dinner out, I couldn't help but to say, "Yes!" although I had no intentions of sitting at home. You see, ever since Alexxis was born, I always imagined that one day we'd share the magic of Kingwood's with her... it was simply a matter of her growing older so she could truly enjoy its beauty, just as we do and last Sunday, our dreams came true!
Here's Alexxis and Papa after feeding the ducks. I wish I could have captured her actually feeding them, but you can see we had a tight rein on this wild child's arm. She was so excited, we worried she fall into the pond!

One last look, before we venture on....


As we enter the gardens areas of the park, it's easier to give Little Miss some "free reigns". She enjoyed running, walking, exploring around the next little corner or what awaits up the next set of steps...

As she slowed down to enjoy nature's beauty, I was able to capture a few photographs of her and capture her curiousity of all the wonders of nature we were viewing.

At least until something else captured her attention and we were "off and running" again!

CED ~ 2008 - Losing momentum...

It seems I started out with "good intentions" this week, but as the week progressed, I seemed to somehow lose that momentum. I'm desiring to get this $1 auction light cleaned up and ready to spray paint black, but this as far as I made it.... dragging it up to and on our deck. Isn't it gorgeous? Yes! It's an outdoor latern/chandelier style light but wouldn't it be perfect for use in our kitchen? I can envision this painted black, rewired, and hung over our kitchen table or over the breakfast bar once all the changes we desire are made to it.
I created this mosiac to show you some of the details. See how the "chandelier" portion hangs down within the latern? The detail of the acanthus leaves... the scroll work details... and its wonderful "oversized" features. I absolutely love it!

Hopefully the next time you see this, it will be nick-named, "Black Beauty" and hung within our home.

I haven't accomplished much this week but that doesn't me from thinking about what "could be".

Tuesday, September 23, 2008

A Banner for Winter... part 1

After showing Elainia the banner I had created for Alexxis' room with her name, we decided to create on for Winter, Elainia's grand-daughter. The top shows the banner completely created and assembled; while the photograph below show more of the details. We use Bazill cardstock, cut 6"x3" then decorated them using Wallies Elainia had brought with her. I assisted with the color choices and made the decision to use the K&Co. Twinkle Type lettering.


The silk flower on the bottom has been stamped using pink colorbox chalk ink and adds a wonderful accent to the "W"...


Another silk flower and glorious fibers adorn the "I"...


and on the "N", you get a close up of those wonderful Wallies Elainia provided. Aren't those just to precious?


I had to break this post into two... so the next three close up photographs are below.

A Banner for Winter... part 2

The "T" is simple, yet gorgeous. It provides a good space for one's eyes to rest. and on the "E" we added a glittered swirl. It provided just the right touch of "girly-girly" to the banner...

and, last but not least, the "R" Again, those angelic faces are so precious!


Elainia and I both fell in love with this. Enjoy this Winter!


CED ~ 2008 - An Awesome Autumn day...


Today was an amazing autumn day! The day's high was in the low 80's, sunny, hardly a cloud in the sky type of day, and only a gently breeze was blowing. I painted this headboard and was able to get it off of my "soon-to-be-completed" to do list. While painting, I could hear the school children out on the playground, laughing and playing, for a while early in the afternoon, even though the school is several blocks away from our home. Once they returned againto their classrooms, I could hear the crickets sing, the church bell rings, and a morning dove coo... it turned out to be the perfect way to spend the early afternoon.
Shortly after I finished painting this, my friend, Elainia showed up and we spent the afternoon out in my studio creating a few things. Since it is fairly "photo-intense" I'll upload it in my next post.

Monday, September 22, 2008

Just writing.... to be writing...

Can you believe today is the first day of Autumn!
It amazes me just how fast time flies right on by....

It was just last week when all I had on my mind was to keep up with the housework, spend some time with family and friends, get my haircut, run a few errands, and spend every moment of my "spare time" getting back to having my studio organized. Here I was, dreaming about creating some of the Autumn decorations that I hoping I would soon be able to get started on, so that I could decorate a little more of our home. I figured "IF" I was lucky, I may even be able to squeeze in a little bit time for myself! I thought I had everything all thought out, and I even planned ahead! adding a few little extra errands and out of my way stops to the previous week's activities, like grocery shopping for the makings of some crock pot meals, and a couple good paperback books to read!
So, what did I do instead?
I spent time cleaning up our home, cooking, and cleaning again. Spent many precious hours with our 2 1/2 year old, dear grand-daughter, Alexxis. Gotta grab those hugs and kisses whenever I can. Which led to more cooking, cleaning up again. Oh, and laundry, more shopping, putting things away, and cleaning! Then, we had a couple of friends over for a nice dinner of homemade beef and noodles, mashed potatoes, green bean casserole, buttermilk biscuits, and I even made a carrot cake one night. ... (Well! sort of... I used the big muffin pan and one small loaf pan, but I made it or baked it, I should say.) I stressed over the bees, the possibility of my husband getting stung, and all the art supplies in my studio. Then on Saturday, I found myself..., and a friend!, helping my dad wash down all four walls of his pool room. Don't ask how that one happened...I figured you've guessed, by now that I "volunteered." I volunteered "us" again, on Sunday, as we watched Alexxis. Only this time we took her on a road trip to visit Kingswood Center. There she feed the ducks (while I tried to keep her out of the water!); she ran through the gardens (while we hoped for a leisurely stroll!): she got wet in the fountains {and us, too!} before we went out to have a spaghetti dinner! If that didn't make her day, I don't know what would have. (I took some pictures --- but left my camera in the Jeep, so I'll have to show ya later.)
But somehow, in the midst of all that chaos, every night I managed to sit down, with a drink beside me, put my feet up, curl up under my comfy throw, and I'll be darned if I didn't read that entire book! I couldn't put it down!!!! If you're curious, the title of the book is "The Wednesday Letters", written by Jason F. Wright. It's a book about , family, friends, love, forgiveness, passion, and so much more. It's been a long time since I read a book that has touched my heart in so very many ways. It reaffirmed in me just how important it is to keep up with my own journals and journal writing, and I believe I'm going to start writing in one of my new ones.... affectionately titled, "The Wednesday Letters". You've gotta read this book!!!
It sort of reminded me of the movie, "The Bucket List" The idea of writing down and actually doing all the things you want to do before you die. I always thought that doing that would be so cool! Heck, I could probably go through my blog archives and create a list from that, LOL!! But, let's save that for another day!
Today, (as a reward for all my recent hard work) I thought I'd go out to studio, gather up some supplies, bring them back in the house and began creating something with an Autumn theme. As I grabbed the broom and dustpan {just in case...} and headed out to the studio, I thought, "Oh NO! You're NOT!" You're not dragging anything out and/or back in... " {Patting myself proudly on the back...} Anyway, it worked.
So, once I was in there, I got busy organizing once again. Funny, it didn't seem like organizing as I cleaned off my work surface in all of 5 minutes! Moved a few boxes, relocated some items, swept up the remanents of several bees, scraps of paper, and glitter... I got my wood mounted
stamps put away within the stamp cabinet. I discovered I definitely need to think about some new storage solutions for some items, most of which I've still a lot of sorting to do! I swept and dusted, picked up a few more things. Held so many things just a little bit tighter! And you know what I realized about that Autumn thing that I desired to do? Well, it hasn't happened yet. But I think I got a whole lot of Autumn-time in which I beat that I can!!!
Happy Fall, Y'all!

Thursday, September 18, 2008

Studio update...on the "Bee Invasion"...

For those who don't know... My paper art studio is located in what was once my hubby's two car heated garage. Behind the wall where my stamping table and cabinet is located, there is a stairway where hubby's large air compresser is located. During the construction of my studio, our contractor ran an additional pipe for the air compressor to the outside for my hubby's access. Unbeknowst to us, honey bees have been gaining access to the outside wall during the summer.


With the remenants of Ike recently passing through the state of Ohio, their "entrance" became blocked. So the bees did what bees do, determine another "route" in and out. Unfortunately, the found their way in by eating through the interior drywall. That's what we believe anyways, after discovering a hole in the drywall in the stairway. The bees gained access to my studio through a small gap under the stairway door, were I discovered over 100 dead, and/or dying bees on Sunday. I'd think the drywall didn't sit too well within their digestive tracts and that began the process of illumination.


Anyways, over the course of the last several days, we've tried, without success, to talk to a few beekeepers so it became clear to us that we definately need to take matters into our own hands before someone gets seriously hurt. We talked with anyone and everyone we could possibly talk to, did internet searches, ect. before finally coming upon several options to remove them. Safety was our first and foremost concern, so we decided upon two options. One was to use Sevens Dust. Hmmm, I really didn't want to spread that around the inside of my studio.... and the other, you'll probably not going to believe...... but we decided to use MOTHBALLS!


My sweet hubby, very bravely I might add, dressed from head to toe, opened the doorway leading to the stairway and threw an entire box of mothballs insides. Granted the smell isn't the greatest, but it worked to kill the bees! After a day, very few bees were flying and those that were, weren't in any condition to be flying around....they were definitely dazed and confused. After another day had passed, all were dead or in the process of dying. Our next task was to get into the wall and remove the hive.... YIKES!


Don decided to cut through the outside north wall from the exterior since we've been in the process of slowly vinyl siding the studio anyways. During the evening, when the bees are less active, he cut in and was able to remove the hive. The hive was in the process of being built from the top rafter and was inbetween two of the 2x4's that form the walls. It's hard to believe I said, "in the process" because that hive was 16" wide by over 5' in length! Could you imagine what it could have been had it not been for the winds and damage of Ike passing through? Thankfully, the bees haven't had the opportunity to begin the "honey making" process, most were dead and continuing to die, and Don escaped with only two bee stings during this entire fiasco. After removing the hive, by knocking it down and using his shop vacaum to sweep it up, he dumped the shop vac into our outdoor wood burner , fired up, and destroyed that hive permanently.


He even used his shop vac to clean up the remains of the bees from my studio. Isn't he sweet? See, I knew he was "a keeper"! I'm so thankful... not to have any of my supplies ruined or worst yet, the need to remove them while bees whirled about my head! Don's been making repairs to the outside walls where he made the cut into the outside studio wall, and hopefully by the time the snow begins flying, the north wall of the studio will also be vinyl sided --- that's the plan anyways....

In the meantime, I'm counting my blessings! My hubby, my studio, my beloved art supplies... Life is Good! I'm actually looking forward to getting back in there to finish my organizing and get on with the creating! I've definately been faced with one of those "Use it or Lose It!" moments...

Tuesday, September 16, 2008

Today, I could just cry....

Many of you are aware that I've been working diligently on organizing my studio in hopes of getting back to creating as often as I can. On Sunday, when I made my way out there, I discovered my studio has been INVADED by bees!!!

It seems we were caught unaware that honey bees have been entering the outside wall over the course of the summer and have made themselves a nest of God only knows how huge! When the remanents of Ike's outer bands and the eye of the storm passed through Ohio on Saturday, with wind gusts into the 75 mph range, tree branches and other debries blocked their entrance, wanna take a guess where they "migrated" too?

Something unknown to us has began the "killing process" as I must have witnessed a burial ground of nearly 100 bees on the floor of my studio alone! Today, we will be contacting a local bee keeper in attempts to remove the bees {safely}, their nest, and repair the damage they've caused. I'm hoping for at least a few large jars of honey for the inconveinence!!!!

But first and most important to me is retrieving all my beloved paper and art supplies!{{{{GASP!}}} My hubby has already been warned that my suppplies come first in any and all attempts to remove these. Please keep us in your prayers......

Friday, September 12, 2008

CED ~ 2008 - Slowing Down; Catching My Breath..


First of all, I want to say, "Thank You" to someone whose friendship has become so very special to me over the years. I first met Lianna of http://llamatales.blogspot.com/ a few years ago by hanging out at Two Peas In A Bucket rubber stamping board. Over the years, we both had joined a Yahoo group, and we began sharing our lives, our adventures, as well as our passions for stamping. We've participated in many swaps together, brightening the lives of those around us, as well as enlightened and brightened by the gifts of art shared with us.


On Wednesday, I was out in my studio, loving just being back in the zone of creating, when in walked my hubby with a package in his hand, and announcing "Mail Delivery" with his sweet grin. I knew I hadn't ordered anything so I had no idea what treasures awaited for me within the contents of the padded envelope, but I couldn't help but feel as if the angels in heaven were singing out their sweet refrains that I was exactly where I was meant to be at that moment! With shaking hands, my heart pounding with the excitement of "what can this be!" I opened the package to discover a treasure trove of unmounted stamps!!!


Lianna had recently been to a stamping convention with a mutual friend and had purchased an entire bucket of unmounted stamps!!! She decided to share some of her treasures with me because she knows I love birds! Isn't that sweet? Thank you so much, girlfriend! I'm flattered and so happy to call you my friend. Your thoughfulness touched me in so many ways and I look forward to incorporating some of those images in my Forbidden Knowledge Altered Book. I can't wait to show you where it is going as I continue to work on creating it and adding in the book's contents.

Yesterday, was a lovely day for me. I spent a lot of time, online, browsing some of my favorite blogs, leaving comments here and there. I sometimes feel guilty when my time is short and my To Do List is so long, that I neglect the friends who I love to visit. It felt great to take Lisa advice to slow down, put my feet up, rest and relax, and I even allowed Don to take me out for dinner! Returning home, I sat down and re-read a lot of these books. With pen in hand, I underlined my favorite parts, wrote notes to myself in the margins, and explored a side of myself that I've truly been missing. After spending a hour or so, I felt inspired to write on the pristine white pages of my sketchbook and wound up just allowing my soul to tell me about the direction it desires to go with Forbidden Knowledge. I made some sketches as the ideas came to me, one sparking another and leading me on to yet another one. I love those moments, when inspiration strikes and your not even looking for it! I have so many more thoughts and ideas that it felt as if my mind would explode if I didn't jot or sketch them in fast enough!!!

I also spent some time remember, September 11, 2001. I offered up prayers to the families, friends, and love ones affected by Terrorism attack on America. I remember where Don and I were, how we heard the news, and couldn't believe our eyes when the images of the day began pouring in on every station on our TV. I remember burning my hand that day by being pre-occupied as I removed the lid from our slow cooker and later feeling so guilty for the relief of the pain after I medicated, wrapped, and bandaged my wound when so many others were possible alive and trapped within the rubble of what once was. And I cried again, shedding tears of pain, of heartache, of frustration for the world in which we live, and I prayed some more for God to be with each and everyone of us the entire world over. May his presence bless you and yours today and always.

Wednesday, September 10, 2008

Forbidden Knowledge Tag Book & Various Images

This shows the front sides of the first two signatures, along with a small walnut inked tag that I added the word, "Desire" to - that word will become more and more important as I begin to work on adding the text and the content of the book itself. The "Glimmer of Hope" booklet is another piece that I previously created but it fits in so wonderfully with the contents of Forbidden Knowledge that I felt it truly belongs here. The text reads, "She began to see a glimmer of hope in the darkness". On the bottom right side of the photograph is the tag booklet. The smallest tag in the front reads, "The entrance of the Word brings light {Psalms 119:130}. If we follow Jesus in enlightment by reading, studying, and feeding on His Word, we will be prepared for emergencies along the way." Again this will play into the contents of the book as I begin to work more and more on it.
The tag under that is a purchased tag with a clock theme and the word, "remember" which also will be significant later. The tag underneath it is the "Hand of Fate" which plays into the theme of Forbidden Knowledge. A smaller tag created from more of the Graphics 45 paper features the word "Times" and images of vintage clocks, while the final tag has words refering to time... "time moves on... yet stands still; never enough time; remember the time?; 27/7/365; no time; time for reflection, ect. All pertinent as I work through historical events....

These are simply close up views of the booklet that graces the first signature. I had created it originally in July of 2005. The front features a nature journal stamped and colored image then the book was bound using a small twig and thin twine. I used actual leaves, four leaf clovers specifically for their "good luck and well wishes" properties, the "evidence" stamp will come into play later, while the "Expedition Notes & Photos" stamp will also become significant.


This is the second pages, or signiture within the small booklet. I used the "found object" stamp from Stampers Anonymous and added in the text, "Burning Bush" The leaves are from the Burning Bush planted in my back yard, again this will become significant later.
As I continue to work on this book, I'll be altering yet another book, a larger one to which this book will be adhered to the front cover. I'm thinking this small edition will become more and more of the introduction to the main theme and the final chapters. I will be using a lot of symbolism and my book will be using a lot scripture verses as well as some actual historical events. I am in no way attempting to sway anyone into believing or seeing things in a different way, just attempting to create art that I can relate to with all of my heart. I know God will be with me on this journey!

Forbidden Knowledge

I began working on my altered book, "Forbidden Knowledge" after gutting an book titled, "Believe and Be Saved". I felt it was a very appropriate title for the contents of the book that I'll begin adding in more and more along the way. The photograph above is the book cover and structure after I covered it with an embossed leather, stamped the image of Madonna and Child, and created the title piece. I intend to use a lot of symbolism within the pages of this book, so I began working more on the books inner structure by creating two signatures.
This is the first signature, I added the small booklet that I created a few years ago. It has been one of my favorite pieces ever since I created in 2005, and fits into this wonderfully. I collaged this page using Graphic 45 papers, the book, and adding a US White Oak vintage stamp.

These two pages are the insides of the above signatures. The left hand side is a library pocket that the tags actually tuck inside of. I removed them for photographing. The third page is again collaged using the Graphic 45 images. These pages are not completed as of yet, but provide the base for things to come.


This is the last page of signature one and the first page of the second signature.


And this is the inside of the second signature in which I used a variety of stamped images, collage items, and even a piece of packaging from some 7 Gypsies embellishments. I did a little more work on some of the items that I'll be adding into the book, one is a tag book that I'll upload next as I didn't want this post to become too photo-burdened and difficult to load.